Category Archives: Operating System

The simple way how to automate printer settings

The Problem

Printer settings are saved per user in the registry under the following key names: “HKEY_CURRENT_USER\Printers\DevModePerUser” and “HKEY_CURRENT_USER\Printers\DevModes2”. Best practice to be enterprise aware is to redirect those settings in a per machine (for all users) location. The settings will then be the same for every user. Deploying settings per user often needs much more effort to ensure that the settings are present to each user than deploying it per machine.

The Solution

Use the build in system api call in PRINTUI.DLL to export the needed printer settings. As result there will be a configuration file that can be used for automation purposes like command line or Custom Action in a Windows Installer based setup file and the printer settings will be automatically per machine based.

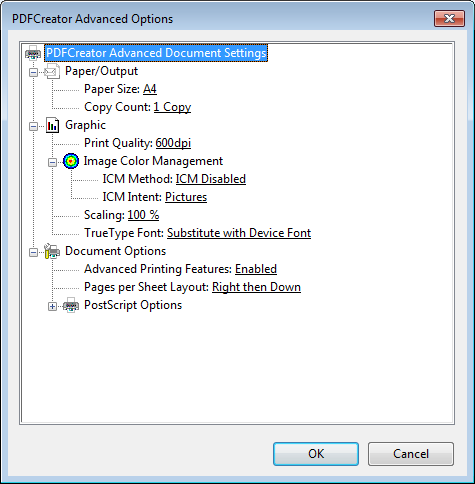
First the Printer settings must be set on a clean machine, for example:
PrinterSettings

Then the settings can be exported by using the following command line:
“C:\Windows\System32\rundll32.exe” PRINTUI.DLL,PrintUIEntry /Ss /n “PrinterName” /a “C:\SettingsFile.dat” /q g d r

The value “PrinterName” is the name of the printer you want to save the settings.
The value “C:\SettingsFile.dat” is the location and files where the printer details will be stored.

To import the settings on a client run the following command line:
“C:\Windows\System32\rundll32.exe” PRINTUI.DLL,PrintUIEntry /Sr /n “PrinterName” /a “C:\SettingsFile.dat” /q g d r

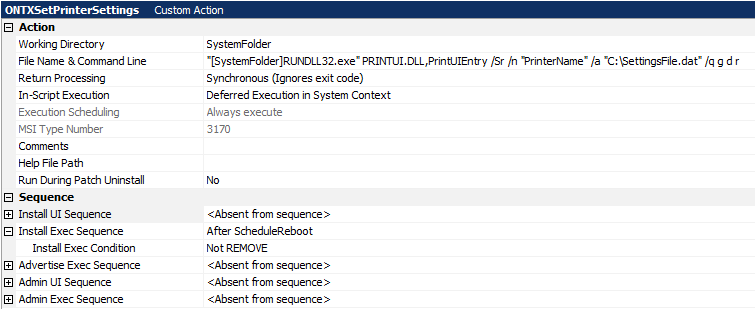
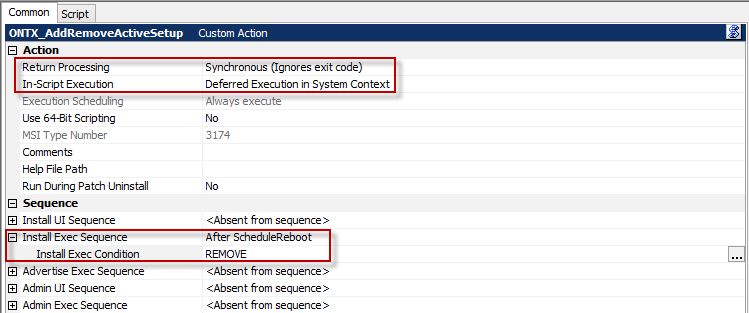
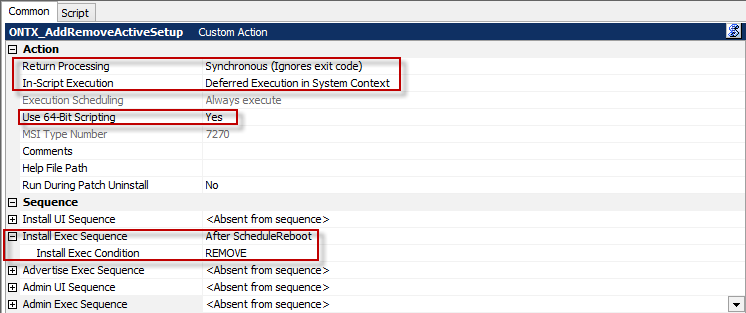
This command line can be used as example as a Windows Installer custom action:

Add the file “SettingsFile.dat” to the installation and create a new custom action at the end of “Execute deferred”:
printersettings


Handling App-V File Type Association in Windows 10 and Windows 8

Since Windows 8 there are a lot of standard file type association set per User. For Example the file type of .mp3 is assigned to the Music Player App:

mp3Win8

If you sequence an application which set the file type association for mp3 as standard to the new application, then the App-V client will not override this  standard value mentioned above:

ftawin8

To avoid this, you have to create two single scripts, which have to be implemented in the DeploymentConfiguration.xml but this will only work for Domain Users and not for a local Windows User Account in App-V 5.0 sp2. This Issue has been fixed with App-V 5.0  SP2 HF4. You have to create a script not a single registry file, which should remove the association for the current user because regedit.exe is an elevated process. An elevated process can not be started by a user in an App-V configuration.xml

  1. Create a script which removes classes “OpenWithProgids” registry key called machine.vbs:
    Dim oShell: Set oShell = CreateObject(“Wscript.Shell”)
    Dim aExt, Ext
    aExt = Split(“|.mp3|”, “|”) ‘for more Values use this: (“|.mp3|.mp4|.wma|”, “|”)
    For Each Ext In aExt
    If Ext <> “” Then
    Call oShell.RegDelete(“HKEY_LOCAL_MACHINE\SOFTWARE\Classes\” & Ext & “\OpenWithProgids\”)
    End If
    Next
  2. Create a script, which will remove the the Current User association and adds the required association for your file type (this will only work for VLC):
    Dim oShell: Set oShell = CreateObject(“Wscript.Shell”)
    Dim aExt, Ext
    aExt = Split(“|.mp3|”, “|”) ‘for more Values use this: (“|.mp3|.mp4|.wma|”, “|”)
    For Each Ext In aExt
    If Ext <> “” Then
    Call oShell.RegDelete(“HKEY_CURRENT_USER\SOFTWARE\Classes\” & Ext & “\OpenWithProgids\”)
    Call oShell.RegDelete(“HKEY_CURRENT_USER\Software\Microsoft\Windows\CurrentVersion\Explorer\FileExts\” & Ext & “\OpenWithProgids\”)
    Call oShell.RegWrite(“HKEY_CURRENT_USER\Software\Microsoft\Windows\CurrentVersion\Explorer\FileExts\” & Ext & “\OpenWithProgids\VLC.” & Ext & “”, 0, “REG_BINARY”)
    Call oShell.RegDelete(“HKEY_CURRENT_USER\Software\Microsoft\Windows\CurrentVersion\Explorer\FileExts\” & Ext & “\UserChoice\”)
    End If
    Next
  3.  Import both files into App-V Package
  4. Edit DeploymenConfig.xml:
    <UserScripts>
    <StartVirtualEnvironment RunInVirtualEnvironment=”false”>
    <Path>wscript //B “[{AppVPackageRoot}]\..\Scripts\user.vbs”</Path>
    <Wait RollbackOnError=”true”/>
    </StartVirtualEnvironment>
    </UserScripts>
    <MachineScripts>
    <AddPackage>
    <Path>wscript //B “[{AppVPackageRoot}]\..\Scripts\machine.vbs”</Path>
    <Wait RollbackOnError=”true” Timeout=”30″/>
    </AddPackage>
    </MachineScripts>

Take care, that application has to be started once by each user, after that the file types are associated to your application.

For more information about package scripts, follow this guide: SHIMSs and App-V 5.0

For more information about file type associations in Windows 8, follow this guide: Windows 8: Associate a file Type or protocol with a specific app using GPO

ReSign VSTO Plugin

To silent install a vsto Office Plug-In it is required that the whole plug-in is signed with a valid certificate. If the certificate is out of date, you will  get this message during installation:

Unknown PublisherEven If you extract the certificate and install it to  the TrustedPublisher Store on the Current Computer you will get no response and the plug-in will not be installed. If you have a look to the event viewer you’ll see this error message:

Event Error

It is necessary to install the VSTO-Plugin silently without any warning, if you want to deploy the Plugin. This is not possible, if the certificate is out of date. The Microsoft Visual Studio contains the mage-tool, that can sign the VSTO and manifest file. You have to resign the DLL, manifest and VSTO files. Follow the following procedure step by step to resign the Plugin properly:

  1. Sign the DLL  with your custom certificate.
  2. Use mageui.exe or mage.exe to sign the Manifest file. Just open the the Manifest and populate the files.
  3. Remove the VSTO file from the Application files table.
  4. Save the manifest file. You will get an error, that the original signer could not be found, you can safely ignore this massage and sign the manifest with your .pfx certificate.

After that, you have to sign the VSTO file with the mageui tool. Open the VSTO and  go to “Application Reference”.

vsto

Select your fresh signed manifest file, save the project and add your certificate information into the signing options.

The vsto plugin is signed now with a valid certificate and can be installed silently.

Professionally remove Excel Add-Ins

The Problem

After uninstalling an application that contains a per user based Excel Add-In (.xlam or .xla), you should start Excel to double-check if an warning message like this appears:

The Reason

Excel installs and registers all automation Add-Ins by default in a per user based location, if they are installed via a script or the Excel GUI.

During uninstall process of an application that has installed such an Excel Add-In the process can only uninstall the registration information of this Add-In in the user context that executes the uninstall process. That means if the application has been used by different users, there will be the registration part left in the other user profiles. Excel will try to load the Excel Add-In, even if the file it self has been removed and this will prompt the warning message.

The Solution

Remove the Excel Add-In registration information from all user profiles. This can be done by using Microsoft Active Setup as the the script we use needs to be executed on each user that operates on the workstation.

This is the location where the Excel Add-In registration information will be stored

[HKEY_CURRENT_USER\Software\Microsoft\Office[Version]\Excel\Options]

The Script

The script is a VBScript.

It needs the full path to the Add-In as an argument.

Example: RemoveExcelAddin.vbs “C:\Hyperion\SmartView\Bin\HsTbar.xla”

This is the source code of the script:

Dim oXL, oAddin
Set oXL = CreateObject(“Excel.Application”)
strPath = WScript.Arguments.Item(0)
oXL.Workbooks.Add
Set oAddin = oXL.AddIns.Add(strPath, False)
oAddin.Installed = False
oXL.Quit
Set oAddin = Nothing
Set oXL = Nothing

Implementation in the Package (32bit)

You need to add the file “RemoveExcelAddin.vbs” to a folder at your choice in the package. Exp. “C:\Windows\System32”.

The component which contains this file, must have the following settings:
Comp

You need to implement a Custom Action “New vbscript stored in custom action” to the package:Cust

The script will add an “Active Setup” to the computer when the product is uninstalling:

Set WshShell = CreateObject(“WScript.Shell”)
WshShell.RegWrite “HKLM\SOFTWARE\Microsoft\Active Setup\Installed Components\RemoveExcelAddon\”, “RemoveAddon”, “REG_SZ”
WshShell.RegWrite “HKLM\SOFTWARE\Microsoft\Active Setup\Installed Components\RemoveExcelAddon\StubPath”, “C:\Windows\System32\RemoveExcelAddin.vbs ” & Chr(34) & “C:\Hyperion\SmartView\Bin\HsTbar.xla” & Chr(34), “REG_SZ”
Cust2

The Custom Action must have the following properties:
Cust1

The 64bit Custom Action must have the following settings:
cust3


Search and Replace Script with AutoIt

The Problem

Hardcoded Paths, Licenses and Computer Names are often saved in static files. MSI doesn’t have a standard action for changing content in a static file. Because of that I have created an AutoIt script that can handle this lack of build in Windows Installer functionality.

AutoIt is a very common tool for system administrators and software packagers as the compiled binary file does not depend on a runtime or prerequisite

The AutoIt Script

This is the code of the script:

$strFilePath = $CmdLine[1]
$strFind = $CmdLine[2]
$strReplace = $CmdLine[3]$strText = FileRead($strFilePath,FileGetSize($strFilePath))
$strText = StringReplace($strText, $strFind, $strReplace)
FileDelete($strFilePath)
FileWrite($strFilePath,$strText)

The Command Line – as example replacing a server name in a text file

Replace.exe “[PathToTheFile]” “[SearchForString]” “[ReplaceWithString]”

PathToTheFile: exp. “C:\Program Files (x86)\Mathcad\Mathcad Prime 1.0\MathcadPrime.exe.config”

SearchForString: exp. “7788@test”

ReplaceWithString: exp. “7788@licsvr”

Implementation in a Windows Installer based Package

Add a new Custom Action in the Deferred Context:


Enter the Details for the Custom Action:

Select the script via clicking onto “Browse”.

Command Line: “[#MathcadPrime.exe.config]” “7788@test” “[ONTXPRIMELICENSEPORT]@[ONTXPRIMELICENSESERVER]”


Enter the Properties for the Custom Action:

Don’t forget to set “Processing” to “Synchronous, Ignore exit code”.

The module failed to load

Neulich bei einem Regsvr32.exe /silent Aufruf einer DLL Datei wurde folgende Fehlermeldung (obwohl der Silent-Paramenter verwendet wurde) ausgegeben:

The module xyz.dll failed to load.
Make sure the binary is stored at the specified path or debug it to check for problems with the binary or dependent .DLL files.
The application has failed to start because its side-by-side configuration is incorrect. Please see the application event log or use the command-line systrace.exe tool for more detail.

Eigentlich dürfte dieses Fenster nicht erscheinen, da der /silent parameter verwendet wurde.

Man sollte sich auch nicht durch die side-by-side configuration in die Irre führen lassen und einfach den guten alten Dependency Walker verwenden.

Der Depency Walker zeigt die fehlenden Komponenten an, welche vor der Registration auf dem Rechner vorhanden sein müssen.

Es geht auch Stück für Stück mit dem Event-Log, der in einem Error Eintrag die benötigte DLL anzeigt.

Kurz gesagt, neue Meldung, altes Problem

.NET Installation Repaketieren

Seit vielen Jahren gibt es Programme, welche auf das Microsoft .NET Framework aufbauen. Deren Anzahl wächst täglich und sind dabei die klassischen 32Bit Com Objekt orientieren Applikationen zu verdrängen. Dementsprechend kommt es häufiger vor, dass eine .NET Framework Applikation repaketiert wird.

Je nach Applikation kann das interpretieren der Ressourcen sehr komplex ausfallen. Speziell dann, wenn Assemblies ins Global Assembly Cache installiert, Interop Registrationen durchgeführt, Native Images erstellt, VC++ Runtimes bereitgestellt und vielleicht noch an den .NET Securities gedreht wird.

Wer .NET Applikationen repaketiert muss die Welt deren Ressourcen verstehen lernen. Eine einfache .NET Applikation aus Sicht der .NET Ressourcen ist einfach zu repaketieren, kommen jedoch weitere .NET Ressourcengebiete dazu, dann ist ohne Grundwissen ein Überblick schwer zu erhalten.

Die .NET Ressourcen können im Grossen und Ganzen in fünf Segmente unterteilt werden:

Nicht jede .NET Applikation benötigt zwangsweise eine komplexe Integration. Im besten Falle besteht die Applikation aus privaten Assemblies und benötigt keine der dargestellten .NET Ressourcen.

Die Herausforderung in der Repaketierung besteht darin, die Ressourcen anhand des Deltas dem richtigen Ressourcen-Typ zuzuordnen und die optimale Installationsmethode zu verwenden. Wir haben uns diesem Problem angenommen und diesen Teil in den ‘Wise – MSI Blackbelt III’ Kurs eingebunden. Diesen Eintageskurs führen wir 1-2 mal pro Jahr durch. Neben dem Thema .NET werden weitere interessante Themen für Fachkräfte im Bereich der Software Paketierung besprochen.

Zusätzliche Special Folders

Die Windows Installer Technologie bietet bereits von Haus aus diverse Directory Properties um auf  “Special Folders” Werte zugreifen zu können.

Leider gibt es jedoch immer wieder der Fall, dass man auf zusätzliche, nicht durch den Windows Installer bereits zu Verfügung gestellte Werte zugreifen muss.

Mit folgendem VBScript kann man sich diese Werte allerdings schaffen. In unserem folgenden Beispiel ermitteln wir den “Common Documents” Folder.

Folgendes Skript fügen wir als “CALL VBScript From Embedded Code”  Aktion im Immediate Bereich ein:

Const CSIDL_COMMON_DOCUMENTS = &h2e
Set objShell = CreateObject(“Shell.Application”)
Session.Property(“ONTX_COMMON_DOCUMENTS”) = objShell.Namespace(CSIDL_COMMON_DOCUMENTS).Self.Path
Set objShell = nothing

Zu beachten ist, das wir diese Aktion vor “CostFinalize” durchführen müssen.

Um den Wert auch für Komponenten verwenden zu können, sollte man noch einen Eintrag in der Directory Tabelle erfassen:

Danach kann man das Property/Directory  wie üblich verwenden.

Eine Liste aller Special Folders befindet sich im Anhang dieses Artikels.

Continue Reading

Side-by-side configuration is incorrect

In letzter Zeit ist die Meldung ‘The application has failed to start because its side-by-side configuration is incorrect’ anzutreffen. Dies bei Windows Vista ohne SP2.

VistaError

Wer versucht das Problem über die Ereignisanzeige zu lösen, wird sich in den Tiefen von .Net wohl verirren.

Ich möchte hier nicht wirklich tiefgründig werden, da dieses Problem mit SP2 oder Windows 7 behoben wurde, braucht man lediglich unter Windows Vista SP1 die folgenden zwei Hotfixes zu installieren:
Windows6.0-KB958481-x86
Windows6.0-KB958483-x86

Nach der Einspielung dieser Hotfixes wird die Applikation funktionieren.

Stefan Hotan
A member of the Ontrex SPA

RegSvr32 failed – Invalid access to memory location

Und auf einmal war sie da – Die Meldung ‘LoadLibrary .dll failed’ die nie zuvor gesehen war.

regsvr32

Das Analysieren mit dem Dependency Walker jedoch zeigt keinerlei Probleme mit dieser Datei, denn es handelt sich um eine Sicherheitserweiterung des Betriebssystemes. Die Data Execution Prevention (DEP) ist für diesen Umstand verantwortlich. DEP wurde gegen Viren und andere sicherheitsrelevanten Funktionen entwickelt. Unter anderem wird DEP die Registration von 16-bit COM Objekten verhindern.

In der Repaketierung kann dieses Problem behoben werden, indem die Self-Registration über die Registry-Tabelle durchgeführt wird.
Um die DLL oder OCX Datei wieder registrieren zu können, muss DEP konfiguriert werden. Die Konfiguration zu DEP findet man unter ‘System Properties’ – ‘Performance’.
Unter ‘Data Execution Prevention’ ist die Option ‘Turn on DEP for all programs and services except those I select:’ anzuwählen und die RegSvr32.exe im System32 Ordner zu wählen.

DataExecution Prevention

Mit dieser Einstellung kann nun die Self-Register Information ausgelesen werden und die entsprechende Registration über die Windows Installer Tabellen erfolgen. Auf diese Weise muss bei den Endanwendern keine DEP Konfiguration durchgeführt werden.

Stefan Hotan
A member of the Ontrex SPA