Category Archives: Uncategorized

SHIMs and APP-V 5.0

We are glad to publish our first blog post from our new APP-V 5.0 advanced techniques series. Today we will have a look onto the new possibility to execute programs & scripts and how to implement shims in that case properly.

With APP-V 4.6 you couldnt really benefit from shims because there was no Event Action where you could trigger an elevated process (All actions were in current-user-context).

There was actually an article from microsoft about it here: http://technet.microsoft.com/en-gb/magazine/ff458340.aspx

However this was limited to environments where user DO have administrative priviliges, however this doesn not apply to most enterprises.

There are of course other solutions like maintaining the shims centrally or deploying them with some classic approach. however most customers really want to keep everything inside the package and prefer to use per user deployment only.

If you dont have a clue what SHIMS or ACT (Application Compatibility Toolkit) is all about, stop here and check out this comprehensive article first:

http://msdn.microsoft.com/de-ch/library/windows/desktop/dd562082(v=vs.85).aspx

As you maybe already know Microsoft introduced the possibility to execute “actions” under the “System” Account for certain events:


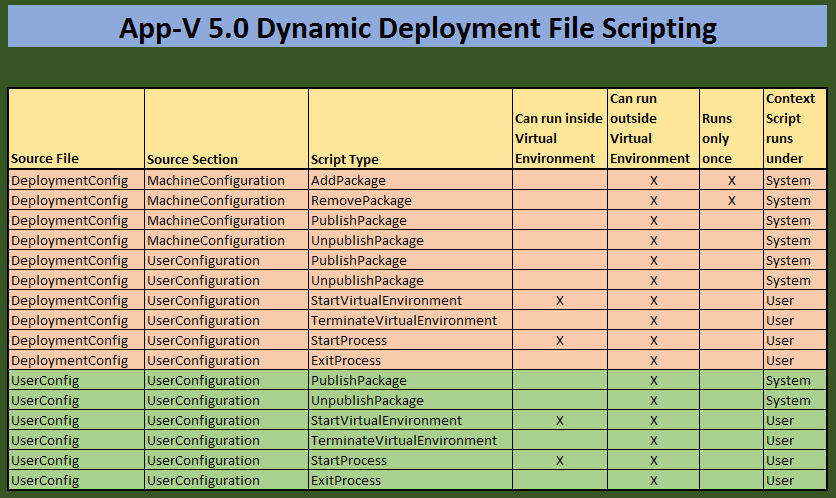
Source: http://www.tmurgent.com/TmBlog/?p=1154

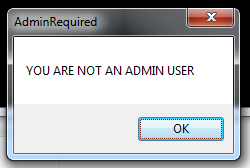
Our example today is a selfmade application called AdminRequired. Yeah, its just an example application which we will use to see our SHIMs working in action!

The application basically just tries to elevate (Vista+, requireAdministrator as requested execution level) and afterwards it runs a deprecated API Call to verify if the current user has administrative priviliges.
In this example application I did actually use the IsUserAnAdmin function from the Shell32.dll (Source: http://goo.gl/EPjxG). As you can imagine this isn’t really a real world scenario however it will help us to demonstrate the Shim fixes.

We are glade to provide you with this application so you can actually try the tutorial for yourself.

Download: AdminRequired.msi

Lets examine our application!

As always we just start by installing this application without using the sequencer. You are asking why?

App-V is not a application compatibility framework or something similiar!

As we already know that our program will produce trouble we should fix those issues first!

I recommend to use a Windows Vista+ Machine with UAC for our demonstrating purpose. After the installation login with an unprivilged (non-admin) User and try to start the application.

The following screen will appear:

2013-03-08_16h54_46

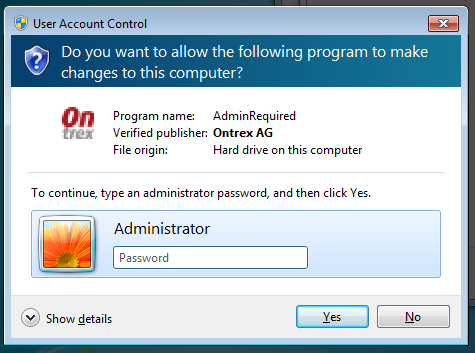
The application is requesting elevation, and because the current user does not have administrative privileges it actually proposed the local admin account.

This however can be easily fixed. To proceed with our application we simply open up a new cmd window and set the __COMPAT_LAYER Environment Variable to “RunAsInvoker” to override the original executionlevel request:


2013-03-26_15h08_05

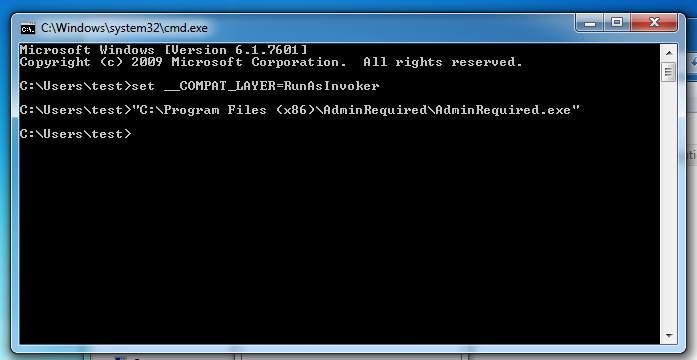
The program starts now without any UAC prompt however our API call still fails:

2013-03-26_15h11_17


Lets shim it!

The only way to implement a workaround for this is now using the Application Compatibility Toolkit (Short ACT). The newest version can be obtained from the Windows Assessment and Deployment Toolkit (ADK).

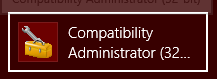
Install this Tool (only the Application Compatibility Toolkit Feature is required) now on your Workstation or the virtual machine and run the Compatibility administrator, in our case 32-bit variant because our executable is a 32-bit executable.

2013-03-27_11h41_14

Then we need to create our “Application Fix”. Rightclick onto “New Database” -> “Create New” -> “Application Fix…”

2013-03-28_11h45_36


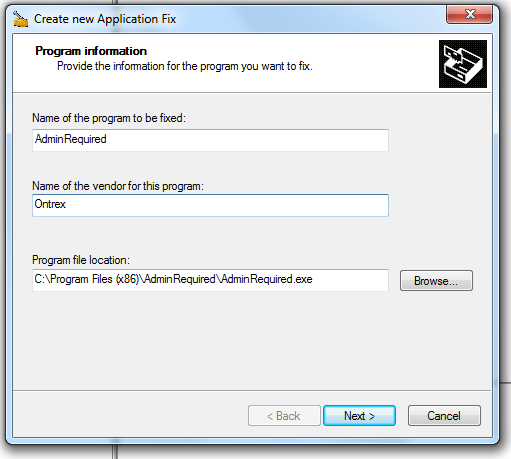
Fill in the information as shown on the screenshot. Lets proceed with “Next > “.

2013-03-28_11h56_22

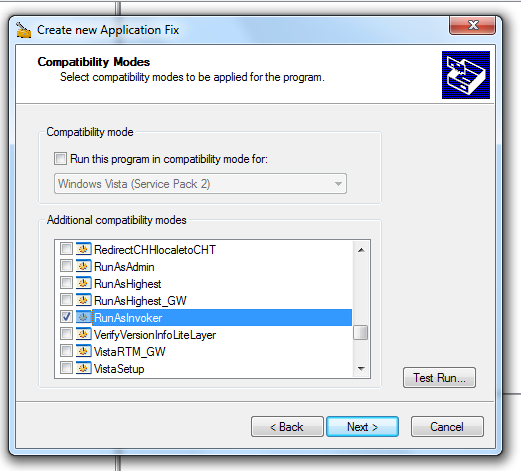
The first fix (no UAC Prompt) is applied by enabling the predefined compatbility mode “RunAsInvoker”. However for our deprecated API we still need another fix. “Next > “.

2013-03-28_13h13_15

“ForceAdminAccess” shims various API Calls which are checking whetever the current user has somehow administrative priviliges. By enabling it for our application it will catch our API Call and always return true. More Information: http://technet.microsoft.com/en-us/library/cc766024(v=ws.10).aspx. Lets continue!

2013-03-28_13h38_10


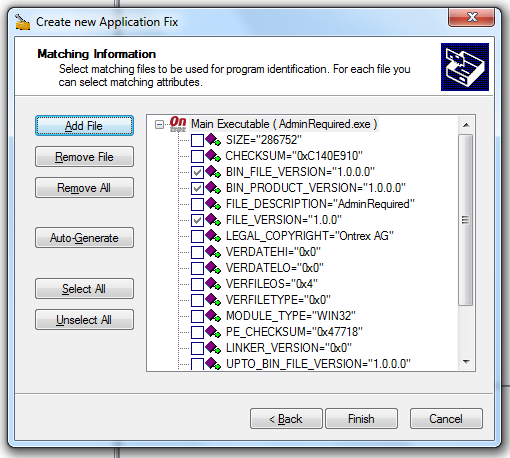
The proposed Matching information should usually be suitable your needs. Click “Finish”.

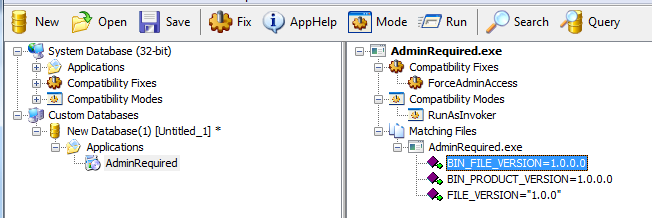
Our “Shim DB” is now finished and should look now like this:

2013-03-28_13h44_12


Save this Database now with the name “AdminRequired.sdb”.

Include into our App-V Package

Now we can start with sequencing our application. This however should be easy and you may follow “common sequencing best practices” to create your package.

Open the package in the sequencer (Editing-Mode) and add your created shim database into the scripts folder:
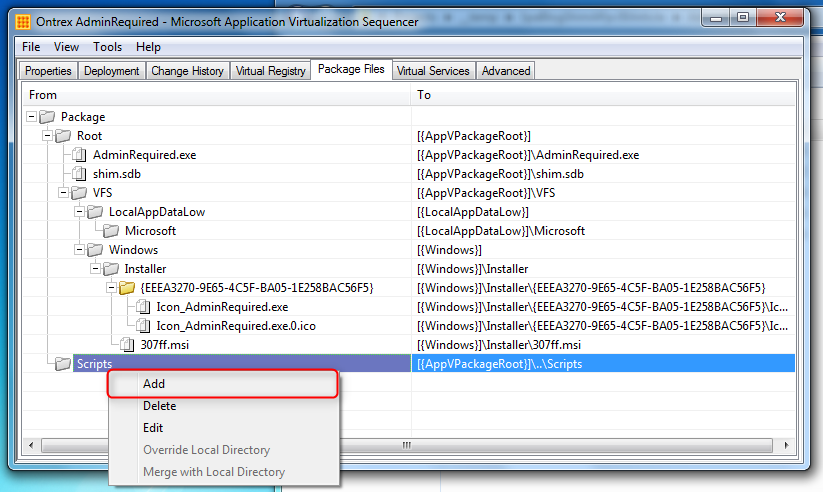
2013-03-28_14h12_24


Result:

2013-03-28_14h55_31


Save the package. We are now ready to adjust the deployment config file to implement the SHIM Installation/Uninstallation upon package import.

Implement the Action

In our example we implement the required action into the deployment XML File (appvname_DeploymentConfig.xml)

Adjust the file as following:

2013-03-28_16h19_01

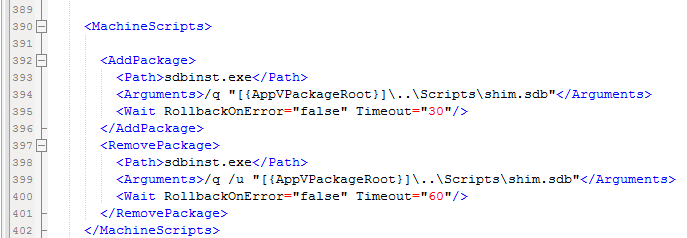
I recommend to use an editor with XML syntax highlighting, otherwise the risk may be very high to include some typos or to miss some other vital elements. If the xml is malformed somehow it will simply fail and have no effect on the client machine.

Test / Run it App-V Streaming Server

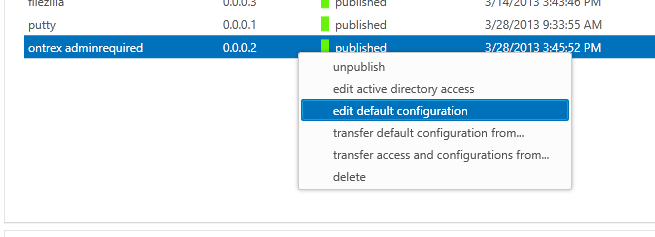
Import the package into the console and ensure that your are overwritting the default configuration with your adjusted deployment_config.xml (this wont happen automatically).

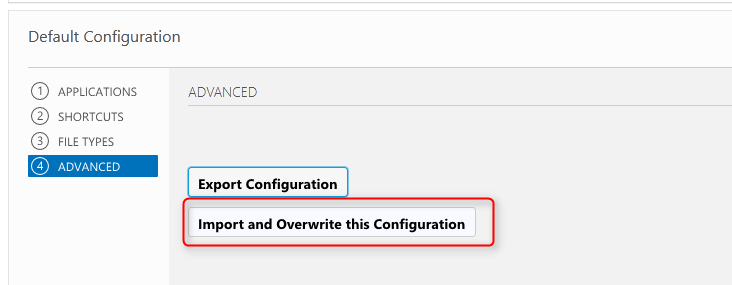
Edit the default configuration…

2013-03-28_16h34_06

and Import your customized XML File:

2013-03-28_16h35_13


Test / Run it PowerShell CMDlets

Import and activate the package. Dont forget to specify the _DeploymentConfig.xml otherwise the information wont be applied!

Add-AppVClientPackage –Path c:PathToMyApp.appv -DynamicDeploymentConfiguration c:PathTo_DeploymentConfig.xml | Publish-AppVClientPackage

 You should be able to test the result for your own now 🙂

Its NOT working!

It is! Did you miss to enable script execution in/for App-V 5.0? (PackageScripts)

PowerShell CMDlet:

Set-AppVClientConfiguration –EnablePackageScripts 1

Regards,

SPA Team

The future of Public User Folder

Since Microsoft did bring the Public User folder to its operating system a Software Developer has officially two locations available to install
files for all users for editing pruposes. But there is one big difference that will make one of them obsolete for the future.

First Location – Old school location %ALLUSERSPROFILE%

Default Location: C:ProgramData<Vendor><Product>

Second Location – The youngest %PUBLIC% location

Also konwn as CSIDL_COMMON_DOCUMENTS
Default Location: C:UsresPublic<Vendor><Product>

The Big Difference since Windows Vista

An application is usualy executed with standard user rights, therefore the Program Files folder is not a location to creating or modifying files.
In fact the Public and All Users folders are used when a central location for create/modify files aktion for an application is needed. 

But did you know that files created in All Users folder can not be modified by a second user? That’s right you can test it easily by creating a file in All Users folder and then try it to modify it with another user account with standard user rights – it will not be possible to overwrite it because only the creator/owner of the file has change/full rights. In fact this is not  well known, as all users will be able to create new files, but modifying a file with another user account is not possible.

How ever this behaviour is valid for Windows Vista and newer Windows Operating systems but not for Windows XP. In Windows XP there is no location available that would make it possible to modify a file for all users. In Windows XP you have to use a tool like SetACL.exe or using Flexera InstallShield – Application Data – Files and folders View

In Files and Folders view you can edit the permissions for Files and Folder. The following setting will make it possible that all ‘Users’ will be able to modify the files in All Users location.

2013-04-03_14h38_41

When using InstallShield Editor make sure that Locked-Down Permissions are set to Custom InstallShield handling:

2013-04-03_14h32_28

The Public folder instead will also allow you to modify the files created by other users, and this fact will make the All Users folder obsolete for the future. If you are a software developer, the public folder will be your preferred location for files that needs to be modified by all users without modifying the operating systems standard security settings.

Regards,

SPA Team

How to disable auto updates for Google products

Google Updater (Omaha) is a background program/service which keeps all installed Google products up to date. 

The Google Updater can be disabled for all Google Products by adding 2 Registry Keys:

[HKEY_LOCAL_MACHINESOFTWAREPoliciesGoogleUpdate]
“InstallDefault”=dword:00000001
“UpdateDefault”=dword:00000000
 
Name Values Description
InstallDefault Disallow
00000000
Allow
00000001
Specifies whether Google software can be installed using Google Update/Google Installer.
UpdateDefault Disabled
00000000
Automatic silent updates
00000001
Manual updates only
00000002
Specifies how Google Update handles available updates.

If you want to deactivate the Google Updater for a specific Google product, use the following Registry Key:

[HKEY_LOCAL_MACHINESOFTWAREPoliciesGoogleUpdate]
"Update[GUID]"=dword:00000000

The GUIDs can be found in the following table:

Product GUID
Chrome {4DC8B4CA-1BDA-483E-B5FA-D3C12E15B62D}
Earth {74AF07D8-FB8F-4D51-8AC7-927721D56EBB}
Earth Pro {65E60E95-0DE9-43FF-9F3F-4F7D2DFF04B5}
Earth Plugin {2BF2CA35-CCAF-4E58-BAB7-4163BFA03B88}

The GUIDs may change in the future. Keep yourself up to date by downloading the current ADM File which contains the corresponding GUIDs: Download.

Regards,

SPA Team

Lets talk about Ghost Repair

A side effect of Windows Installer Entry-Points can cause the Windows Installer to repair an application that was not even target to be run from the launched process.

MSIGhostRepairEventLog

If the event log shows a warning about an application that has not been launched then this article could bring some light into the dark.

A ghost repair will be started by a process that in general uses a com object like an activex object.
The binary file of this object has been installed by a windows installer based setup (MSI).
In this article I did decide to show a ghost repair based on the following windows scripting host file:

MSIGhostRepairvbs

The following diagram explains in short the ghost repair in a simple way:

MSIGhostRepair


1. A process will call a com object in this case it’s a windows scripting host file
2.  cscript.exe is executing an activex object
3. The Dll-Loader will now handle the registry read request to inizialize the ocx or dll file
4. In the registry the HotInstaller.HotCom Programmatic Identifier will be read in order to get it’s CLASS ID
5. In the registry the InprocServer32 will be read from the related CLASS ID
6. The Dll-Loader process is detecting an InprocServer32 value in InprocServer32 Key that holds a DarwinDescriptor
7. The DarwinDescriptor holds Windows Installer Details: ProductID, Feature that Installed this file, ComponentCode
8. Enumerates all related Windows Installer Features (Feature in DarwinDescriptor and all it’s parent Features) and checks all compontents key-pahts of the enumerated features for it’s existance
9. If a key path is missing, the ghost repair will repair the product that was hold in the DarwinDescriptor.
10. If everything is fine, the Key-Path of the component found in the DarwinDescriptor will be loaded into the memory
11 and 12. cscript.exe is using the activex object that is now available in the memory

Some technical details

Point 6. where the DLL-Loader detects the darwin descriptor – this value will be genereated by using the Class table:

After running the setup, the class entry will show an additional key with the name InprocServer32 and it’s value will hold ProductCode, Feature and ComponentCode from the Windows Installer based setup.

Point 8 – checks component key paths for it existence – this is the point where the Setup Design of the installed product will cause the ghost repair. In most cases it’s the combination of Current User Registry Keys and a shared component based on COM technology. Installations where ressources in a flat feature structure are installed will cause a ghost repair because all key paths of the target feature and parent features will be checked for its existance. If one key path is missing, the windows installer will start a self repair process.

This is a simple flat feature setup desing that is able to cause a ghost repair.

GhostRepairSetupDesign

How to fix the ghost repair issue:

There are muliple ways to fix this issue.

The most common way to fix this issue is to enhance the setup design with shared component awareness. Separate the shared components into a new root feature.

GhostRepairAdvancedSetupDesign

Another way would be to delete the darwin descriptor from each operating system that is target of the issue.

1. Deleting the InprocServer32 key with the darwin descriptor value will 2. fallback the DLL-Loader to the standard initialisation way without windows installer technology

GhostRepairFix

This may only be a workaround, as a repair or reinstallation of the product will recreate the darwin descriptor.

Ontrex User Group Meeting – Software Packaging für Windows 8 Presentation

Ontrex

for those who have missed the Ontrex user group meeting we are able to provide you with the slides of our presentation about windows 8 (however only available in german slides):

Continue Reading

Microsoft App-V 5.0


We are glad to hear about the general availability of APP-V 5.0 RTM.

The Ontrex SPA is already prepared for this major upgrade and is happy to be able to offer you various services regarding APP-V 5.0 which includes but is not limited to:

Migration Services (from earlier APP-V Versions), Consulting Services, Trainings and of course our matchless software packaging services.

Source: App-V 5.0 RTM now released!

Frequent x64/x86 traps

Today i want to take care of some very frequent traps regarding x86/x64.

Runtimes 

The question is usually very simple: Which runtime architecture do i have to preinstall for my X86 Application on a Windows x64 Operating System?

For those who dont know what runtimes are ill give some examples:

  • Microsoft Visual C++ 2008 Redistributable
  • Microsoft SQL Server 2008 Native Client
  • Microsoft Core XML Service 6

Short answer: Usually you must match the applications architecture not the operating system ones!

But the exception proves the rule. Lets examine: “Microsoft SQL Server 2008 Native Client”:

When you actually try to install the x86 runtime on a windows x64 it will simply block the installation.

But why? i think microsoft wants to stop those confusing situation by creating packages which simply match the OS Architecture. So people dont have to care about the applications architecture.

Because if you look inside the x64 MSI you will see the following:

As you can see the x64 Installer also contains the x86 version of the SQL Native Client.

ODBC Data Sources  / Drivers

Another nightmare which leads to many inquires from our customers.

ODBC Data Sources & Drivers are seperate for each Architecture due to the Registry Redirection mechanism of “Windows on Windows64” (WOW64).

X86 Applications need x86 Data Sources / Drivers and x64 Applications need x64 Data Sources / Drivers.

In our opinion the biggest mistake microsoft has done is just to link to the x64 ODBC Administrator in the Control Panel despite the fact that the application landscape is still mostly x86.

To open you the x86 ODBC Administrator you must manually run:

C:WindowsSysWOW64odbcad32.exe

Those entries will be used for native x86 application. Bear that in mind.

Regards,
Fabio


Microsoft Application Virtualization 4.5 client service fails to start with Symantec PGP Installed

Microsoft has published a new KB article which may be interesting for our customers which may want to plan to use Symantec PGP concurrently with APP-V 4.5.

According to this article the Microsoft APP-V Service wont start as long as an incompatible product is installed.

[01/11/2011 08:12:56:691 INTF ERR] {tid=C10}The Application Virtualization Client service cannot be initialized because it found an incompatible product (PGP Desktop version 10.2.0.1672).  No known compatible version exists.

This is for protection purpose because otherwise a BSoD could appear.

The only solution currently available is upgrading to app-v client version 4.6 or higher.

Source: http://goo.gl/xiwiY (KB2625501)

Regards,

Fabio

App-DNA acquired by Citrix

Another breaking news did hit the Software Packaging market.

Citrix Enters into agreement to acquire App-DNA.

App-DNA will operate as a new product group in the Citrix Desktop and Apps team.

This information has been shared by an info email from Mike Welling from App-DNA.

Read the full story at http://www.citrix.com/English/NE/news/news.asp?newsID=2317537


Determine OS/User UI Language

Somestimes our customers require us to package the software that way that it automatically sets the language according to the Windows UI Language.

Now the big question is, which is the best way to determine the language during a windows installer “transaction”?

Here you are:

dim dezUI,hexUI,language
dezUI = GetUILanguage
hexUI = hex(dezUI)

do while len(hexUI) < 4
	hexUI = "0" + hexUI
loop

If hexUI = "0404" Then
	language = "T_Chinese"

ElseIf hexUI = "0804" Then
	language = "S_Chinese"

Elseif right(hexUI,2) = "07" Then
	language = "german"

Elseif right(hexUI,2) = "09" Then
	language = "english"

Elseif right(hexUI,2) = "0C" Then
	language = "french"

ElseIf hexUI = "0411" Then
	language = "Japanese"

ElseIf hexUI = "0412" Then
	language = "Korean"

ElseIf hexUI = "0416" Then
	language = "B_Portuguese"

Elseif right(hexUI,2) = "0A" Then
	language = "spanish"

Else
	language = "english"

End If

Session.Property("ONTX_LANGUAGE") = language

First we get the “decimal format” of the current UI language. The returned string is e.g 1033 which actually means “English – United States”.

Thats the first challenge: We usually only want to match a language and not a region at all. The next step is to convert that string into a hexdecimal value. And after that we have a value like this ‘409’. This value however must be 16Bit and therefore we add leading zero’s till we have a 4 digit hex value.

Now its quiet simple: the last 2 digits always(*) represent the language and the first 2 digits are for the region.

Examples:

  • All english languages end with 09
  • All french languages end with 0c
  • All german languages end with 07

Bear in Mind: UI Language is a per user setting and you cannot therefore “ask” the operating system for it during a initial installation. this will run in system context and will always return english as language. you can however abuse the self repair or activesetup mechanism to run this script in per user context and then write the corresponding registry key/files.

(*) No rules without exceptions, you should anyway consult the following microsoft article:

Locale IDs Assigned by Microsoft: http://goo.gl/vjjst