Category Archives: Tools

All new in Software Packaging products

Windows 10 is out and all major Software Packaging applications and products have now been updated.

Microsoft
APP-V 5.1 has been released with some nice new features
https://technet.microsoft.com/en-us/library/mt346499.aspx

Flexera
AdminStudio 2015 has been released
http://www.flexerasoftware.com/enterprise/products/application-packaging/adminstudio/

Raynet
RayPack Version 2.0 has been released
https://raynet.de/en/Raynet-Products/RayPack

VMware
VMware Workstation Pro 12.0 has been released
http://www.vmware.com/products/workstation

The simple way how to automate printer settings

The Problem

Printer settings are saved per user in the registry under the following key names: “HKEY_CURRENT_USER\Printers\DevModePerUser” and “HKEY_CURRENT_USER\Printers\DevModes2”. Best practice to be enterprise aware is to redirect those settings in a per machine (for all users) location. The settings will then be the same for every user. Deploying settings per user often needs much more effort to ensure that the settings are present to each user than deploying it per machine.

The Solution

Use the build in system api call in PRINTUI.DLL to export the needed printer settings. As result there will be a configuration file that can be used for automation purposes like command line or Custom Action in a Windows Installer based setup file and the printer settings will be automatically per machine based.

First the Printer settings must be set on a clean machine, for example:
PrinterSettings

Then the settings can be exported by using the following command line:
“C:\Windows\System32\rundll32.exe” PRINTUI.DLL,PrintUIEntry /Ss /n “PrinterName” /a “C:\SettingsFile.dat” /q g d r

The value “PrinterName” is the name of the printer you want to save the settings.
The value “C:\SettingsFile.dat” is the location and files where the printer details will be stored.

To import the settings on a client run the following command line:
“C:\Windows\System32\rundll32.exe” PRINTUI.DLL,PrintUIEntry /Sr /n “PrinterName” /a “C:\SettingsFile.dat” /q g d r

This command line can be used as example as a Windows Installer custom action:

Add the file “SettingsFile.dat” to the installation and create a new custom action at the end of “Execute deferred”:
printersettings


Handling App-V File Type Association in Windows 10 and Windows 8

Since Windows 8 there are a lot of standard file type association set per User. For Example the file type of .mp3 is assigned to the Music Player App:

mp3Win8

If you sequence an application which set the file type association for mp3 as standard to the new application, then the App-V client will not override this  standard value mentioned above:

ftawin8

To avoid this, you have to create two single scripts, which have to be implemented in the DeploymentConfiguration.xml but this will only work for Domain Users and not for a local Windows User Account in App-V 5.0 sp2. This Issue has been fixed with App-V 5.0  SP2 HF4. You have to create a script not a single registry file, which should remove the association for the current user because regedit.exe is an elevated process. An elevated process can not be started by a user in an App-V configuration.xml

  1. Create a script which removes classes “OpenWithProgids” registry key called machine.vbs:
    Dim oShell: Set oShell = CreateObject(“Wscript.Shell”)
    Dim aExt, Ext
    aExt = Split(“|.mp3|”, “|”) ‘for more Values use this: (“|.mp3|.mp4|.wma|”, “|”)
    For Each Ext In aExt
    If Ext <> “” Then
    Call oShell.RegDelete(“HKEY_LOCAL_MACHINE\SOFTWARE\Classes\” & Ext & “\OpenWithProgids\”)
    End If
    Next
  2. Create a script, which will remove the the Current User association and adds the required association for your file type (this will only work for VLC):
    Dim oShell: Set oShell = CreateObject(“Wscript.Shell”)
    Dim aExt, Ext
    aExt = Split(“|.mp3|”, “|”) ‘for more Values use this: (“|.mp3|.mp4|.wma|”, “|”)
    For Each Ext In aExt
    If Ext <> “” Then
    Call oShell.RegDelete(“HKEY_CURRENT_USER\SOFTWARE\Classes\” & Ext & “\OpenWithProgids\”)
    Call oShell.RegDelete(“HKEY_CURRENT_USER\Software\Microsoft\Windows\CurrentVersion\Explorer\FileExts\” & Ext & “\OpenWithProgids\”)
    Call oShell.RegWrite(“HKEY_CURRENT_USER\Software\Microsoft\Windows\CurrentVersion\Explorer\FileExts\” & Ext & “\OpenWithProgids\VLC.” & Ext & “”, 0, “REG_BINARY”)
    Call oShell.RegDelete(“HKEY_CURRENT_USER\Software\Microsoft\Windows\CurrentVersion\Explorer\FileExts\” & Ext & “\UserChoice\”)
    End If
    Next
  3.  Import both files into App-V Package
  4. Edit DeploymenConfig.xml:
    <UserScripts>
    <StartVirtualEnvironment RunInVirtualEnvironment=”false”>
    <Path>wscript //B “[{AppVPackageRoot}]\..\Scripts\user.vbs”</Path>
    <Wait RollbackOnError=”true”/>
    </StartVirtualEnvironment>
    </UserScripts>
    <MachineScripts>
    <AddPackage>
    <Path>wscript //B “[{AppVPackageRoot}]\..\Scripts\machine.vbs”</Path>
    <Wait RollbackOnError=”true” Timeout=”30″/>
    </AddPackage>
    </MachineScripts>

Take care, that application has to be started once by each user, after that the file types are associated to your application.

For more information about package scripts, follow this guide: SHIMSs and App-V 5.0

For more information about file type associations in Windows 8, follow this guide: Windows 8: Associate a file Type or protocol with a specific app using GPO

ReSign VSTO Plugin

To silent install a vsto Office Plug-In it is required that the whole plug-in is signed with a valid certificate. If the certificate is out of date, you will  get this message during installation:

Unknown PublisherEven If you extract the certificate and install it to  the TrustedPublisher Store on the Current Computer you will get no response and the plug-in will not be installed. If you have a look to the event viewer you’ll see this error message:

Event Error

It is necessary to install the VSTO-Plugin silently without any warning, if you want to deploy the Plugin. This is not possible, if the certificate is out of date. The Microsoft Visual Studio contains the mage-tool, that can sign the VSTO and manifest file. You have to resign the DLL, manifest and VSTO files. Follow the following procedure step by step to resign the Plugin properly:

  1. Sign the DLL  with your custom certificate.
  2. Use mageui.exe or mage.exe to sign the Manifest file. Just open the the Manifest and populate the files.
  3. Remove the VSTO file from the Application files table.
  4. Save the manifest file. You will get an error, that the original signer could not be found, you can safely ignore this massage and sign the manifest with your .pfx certificate.

After that, you have to sign the VSTO file with the mageui tool. Open the VSTO and  go to “Application Reference”.

vsto

Select your fresh signed manifest file, save the project and add your certificate information into the signing options.

The vsto plugin is signed now with a valid certificate and can be installed silently.

Professionally remove Excel Add-Ins

The Problem

After uninstalling an application that contains a per user based Excel Add-In (.xlam or .xla), you should start Excel to double-check if an warning message like this appears:

The Reason

Excel installs and registers all automation Add-Ins by default in a per user based location, if they are installed via a script or the Excel GUI.

During uninstall process of an application that has installed such an Excel Add-In the process can only uninstall the registration information of this Add-In in the user context that executes the uninstall process. That means if the application has been used by different users, there will be the registration part left in the other user profiles. Excel will try to load the Excel Add-In, even if the file it self has been removed and this will prompt the warning message.

The Solution

Remove the Excel Add-In registration information from all user profiles. This can be done by using Microsoft Active Setup as the the script we use needs to be executed on each user that operates on the workstation.

This is the location where the Excel Add-In registration information will be stored

[HKEY_CURRENT_USER\Software\Microsoft\Office[Version]\Excel\Options]

The Script

The script is a VBScript.

It needs the full path to the Add-In as an argument.

Example: RemoveExcelAddin.vbs “C:\Hyperion\SmartView\Bin\HsTbar.xla”

This is the source code of the script:

Dim oXL, oAddin
Set oXL = CreateObject(“Excel.Application”)
strPath = WScript.Arguments.Item(0)
oXL.Workbooks.Add
Set oAddin = oXL.AddIns.Add(strPath, False)
oAddin.Installed = False
oXL.Quit
Set oAddin = Nothing
Set oXL = Nothing

Implementation in the Package (32bit)

You need to add the file “RemoveExcelAddin.vbs” to a folder at your choice in the package. Exp. “C:\Windows\System32”.

The component which contains this file, must have the following settings:
Comp

You need to implement a Custom Action “New vbscript stored in custom action” to the package:Cust

The script will add an “Active Setup” to the computer when the product is uninstalling:

Set WshShell = CreateObject(“WScript.Shell”)
WshShell.RegWrite “HKLM\SOFTWARE\Microsoft\Active Setup\Installed Components\RemoveExcelAddon\”, “RemoveAddon”, “REG_SZ”
WshShell.RegWrite “HKLM\SOFTWARE\Microsoft\Active Setup\Installed Components\RemoveExcelAddon\StubPath”, “C:\Windows\System32\RemoveExcelAddin.vbs ” & Chr(34) & “C:\Hyperion\SmartView\Bin\HsTbar.xla” & Chr(34), “REG_SZ”
Cust2

The Custom Action must have the following properties:
Cust1

The 64bit Custom Action must have the following settings:
cust3


Running Wise Package Studio on Windows 10 and SQL Server 2014


Wise Package Studio is now for multiple years End of Life but it still have a solid base of user using it.

Is Wise Package Studio 8.0 MR1 compatible with Windows 10 and Microsoft SQL Server 14? This question has been raised several times to me – so here is my basic setup and product functionality test.

The Installation part

It took some minutes until the Welcome windows did appear but finally we are good to start the product without any error messages.

2014-12-04_09h52_12

For my test I will run a full Professional Installation (Server Part) on a local Windows 10 Build.

2014-12-04_09h55_44

The Setup did run fast and without any error messages.

2014-12-04_09h59_06

The Symantec Program Menu Folder was not shown until a restart

2014-12-04_10h08_04

I noticed a long delay in starting up the Wise Repository Manager, but finally we are ready to setup the Wise Share Point.

All three Databases have been created on my local Windows 2014 SQL Server without errors and the Software Repository has been setup without problems but it did also took a long time to processing the share point databases.

2014-12-04_11h42_58     2014-12-04_11h43_50


The basic Tool Test

The Setup Capture did scan the OS fast as known from Wise Solutions

2014-12-04_11h52_48


The Windows Installer Editor is also working fine, all three views (Installation Expert, MSI Script and Setup Editor) are working without display problems.

2014-12-04_12h40_55

Compiling the repackaged application works also without delay or problems.

2014-12-04_12h39_37

A quick test of the Software Manager shows also no problems. The Wise Task Manager works as expected.

2014-12-04_12h45_19

Last but not least creating with Wise Script executable to see if a 64-Bit registry key will be set.

2014-12-04_12h47_31

and it works

2014-12-04_12h49_51


The final result

Of course this was a quick test that did not cover all Wise applications and all features.

But I did not have any major issues or any function/routine that did fail or return an error message.


Packaging Tools for OS X

Finding the best tool is sometimes very difficult. This is why i show you here my favorite packaging tools for OS X.

Iceberg

Iceberg is an Integrated Packaging Environment (IPE) that allows you to create packages or metapackages conforming to the Mac OS X specifications. It’s easy to use and offers a lot of settings.

http://s.sudre.free.fr/Software/Iceberg.html

Absolute Manage InstallEase Package Creation Utility

Absolute Manage InstallEase Package Creation Utility is used for creating snapshots. This tool can create an project file for Iceberg. I use it only for the creation of snapshots and uninstall packages.

http://www.absolute.com/products/endpoint-management/InstallEase

XCode

XCode needs to be installed in order to create uninstall packages with the Absolute Manage InstallEase Package Creation Utility. This tool can also be used for package creation.

https://developer.apple.com/technologies/tools/

Wise Script requires a higher edition

wis

The last version of Wise Script Editor has been released by Flexera Software in the year 2012.

It is a stand-alone installer called WiseScript Package Editor.msi and can be downloaded here.

In order to run the Wise Script Editor you must run AdminStudio for Symantec otherwise you will get the following message:

Running Wise Script Editor with AdminStudio from Flexera will return ‘This feature requires a higher edition of AdminStudio’.

WIS requires a higher version

AdminStudio for Symantec is not anymore available, it has been discontinued by Flexera Software and  replaced with AdminStudio 2013 from Flexera Software.

The Wise Script Editor  is not  part of AdminStudio 2013 from Flexera Software. If you have purchased AdminStudio for Symantec it’s possible to get the correct Wise Script Editor.

Simply use the Flexera Customer Support to submit a request for obtaining the Wise Script Editor.

Active Setup and Per-User/Per-Machine registry

The Windows Installer allows you to create a setup which will dynamically writes registry keys into either  HKCU or HKLM. This behaviour is then controlled by the “ALLUSERS” Property.

The Windows Installer Help describes this feature as follow:

 Constant  Hexadecimal  Decimal  Root key
 (none)  – 0x001  -1  If this is a per-user installation, the registry value is written under HKEY_CURRENT_USER.If this is a per-machine installation, the registry value is written under HKEY_LOCAL_MACHINE. Note that a per-machine installation is specified by setting the ALLUSERS property to 1.

We will now provide an example to illustrate this behaviour:

reg01


In this MSI I have chosen the “AppDataFolder” system property as Value  in order to check the resolved path. The path will be different for each user because its an per-user defined system property.

If you install this key with the ALLUSERS Property set to “1” the result will be as following:

[HKEY_LOCAL_MACHINE\SOFTWARE\Ontrex\Example]
"UserOrMachine"="C:\Users\Administrator\AppData\Roaming\"

The key will be installed into HKLM however the property will be resolved according to the current installing user.

If you install this application again with ALLUSER set to “2”  the result will look like this:

[HKEY_CURRENT_USER\Software\Ontrex\Example]
"UserOrMachine"="C:\Users\test\AppData\Roaming\"

More details about this behaviour/feature can be obtained from the following MSDN Article:

http://blogs.msdn.com/b/windows_installer_team/archive/2009/09/02/authoring-a-single-package-for-per-user-or-per-machine-installation-context-in-windows-7.aspx

Conclusion: The registry root parameter can be used to dynamically write the registry keys into HKCU or HKLM  based on the current installation context (Per-User <> Per-Machine)

But what happens if you have a per machine installation which contains an active setup mechanism?

Let’s have a deeper look into it:

We add all corresponding registry keys, features and components to the MSI  which are required  for a fully functional Active Setup.

Now let’s install the MSI under system account with ALLUSER=1 and check the example registry key.

The Result is:

[HKEY_LOCAL_MACHINE\SOFTWARE\Ontrex\Example]
"UserOrMachine"="C:\Windows\system32\config\systemprofile\AppData\Roaming\"

Now log off and log on with a standard user account and check the key again and something unexpected happened. As you see the key changed to:

[HKEY_LOCAL_MACHINE\SOFTWARE\Ontrex\Example]
"UserOrMachine"="C:\Users\test\AppData\Roaming\"

What happend?

The Property ALLUSERS sets the installation to a  machine installation and the Active Setup will be execute with the following option “/fu” (all required user-specific registry entries).

Answer:
During the active setup the windows installer will repair the MSI in User Context and only user-specific registry keys will be rewritten (“/fu” parameter). All “-1” however are simply considered as “user based keys” even the ALLUSERS property is set to “1”. Because the repair works with elevated priviliges this HKLM key will now be rewritten using the current users [AppDataFolder] value.

Our conclusion

We will kindly advice you not to use “-1” in the root column of the Registry table in a windows installer database in conjunction with active setup. Also bear that in mind when you are adding activesetup to an existing vendor msi (Transform).

Regards,

SPA Team

COM Components

The Component Object Model (COM) is a technology developed by Microsoft to enable Windows interprocess communication and dynamic object creation. COM Objects are language independent and can be implemented in any development language which has a compiler that can compile the approriate code, such as C++.

Typical examples of compiled code are:

  • DLL (Dynamic Linking Library)
  • OCX (ActiveX control)
  • TLB (Type Libraries)
  • EXE (Executables)

The access to the funtionality of a COM Object takes place through an interface, which allows the functions offered by the COM Object.

Using the “REGSVR32.EXE” Tool the most common binaries such as DLL and OCX can be registered. Thereby new class IDs are created in the registry database that refer to the relevant binary file. Thus, their functions can now be used on Windows and programs access the class IDs to perform required functions.


Examples registering compiled codes:

In case of DLL/OCX

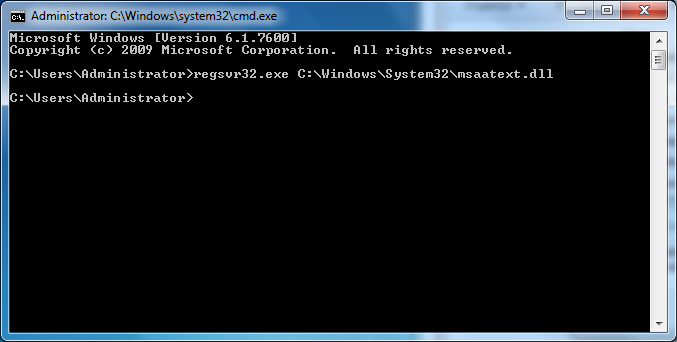
To register a DLL or OCX, use regsvr32.exe as follows:

  1. Select Start -> Run
  2. In the dialog box, type the following:

Regsvr32 <full path of DLL or OCX to be registered>

For example, “regsvr32 C:\Windows\System32\msaatext.dll” would register the library named msaatext.

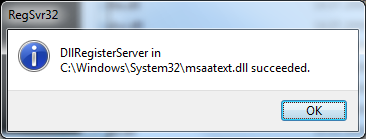
If successful, you’ll see the message:


Why not all DLL’s can be registered

A DLL needs to be specifically written to be used with the regsvr32 command to register.
The DLL must implement DllRegisterServer and DllUnregisterServer, which contain the logic that is necessary to add or delete the required registry entries for the COM component. RegSvr32 finds the entry point to these functions, and calls them appropriately.
If the DLL was not written to be used with regsvr32 then the conventional entry point will not be found, and you get an error message.


In case of TLB

To register a type library, use regtlib.exe.

  1. Select Start -> Run
  2. In the dialog box, type the following

Regtlib <full path to the type library>

For example, “regtlib C:\Program Files\MyApp\MyTypeLib.tlb” would register the library MyTypeLib.

If successful, a dialog box similar to the one shown for the DLL will appear.

In case of EXE

To register an EXE:

  1. Select Start -> Run
  2. In the dialog box, type the following:

<Full path of the EXE file> /RegServer

For example, “C:\Program Files\myAPP\MyEXE.exe /RegServer” will register the Executable MyExe.exe.


Different Types of registration Keys

components


Below you find some registry keys in relation with com components and its explanations.
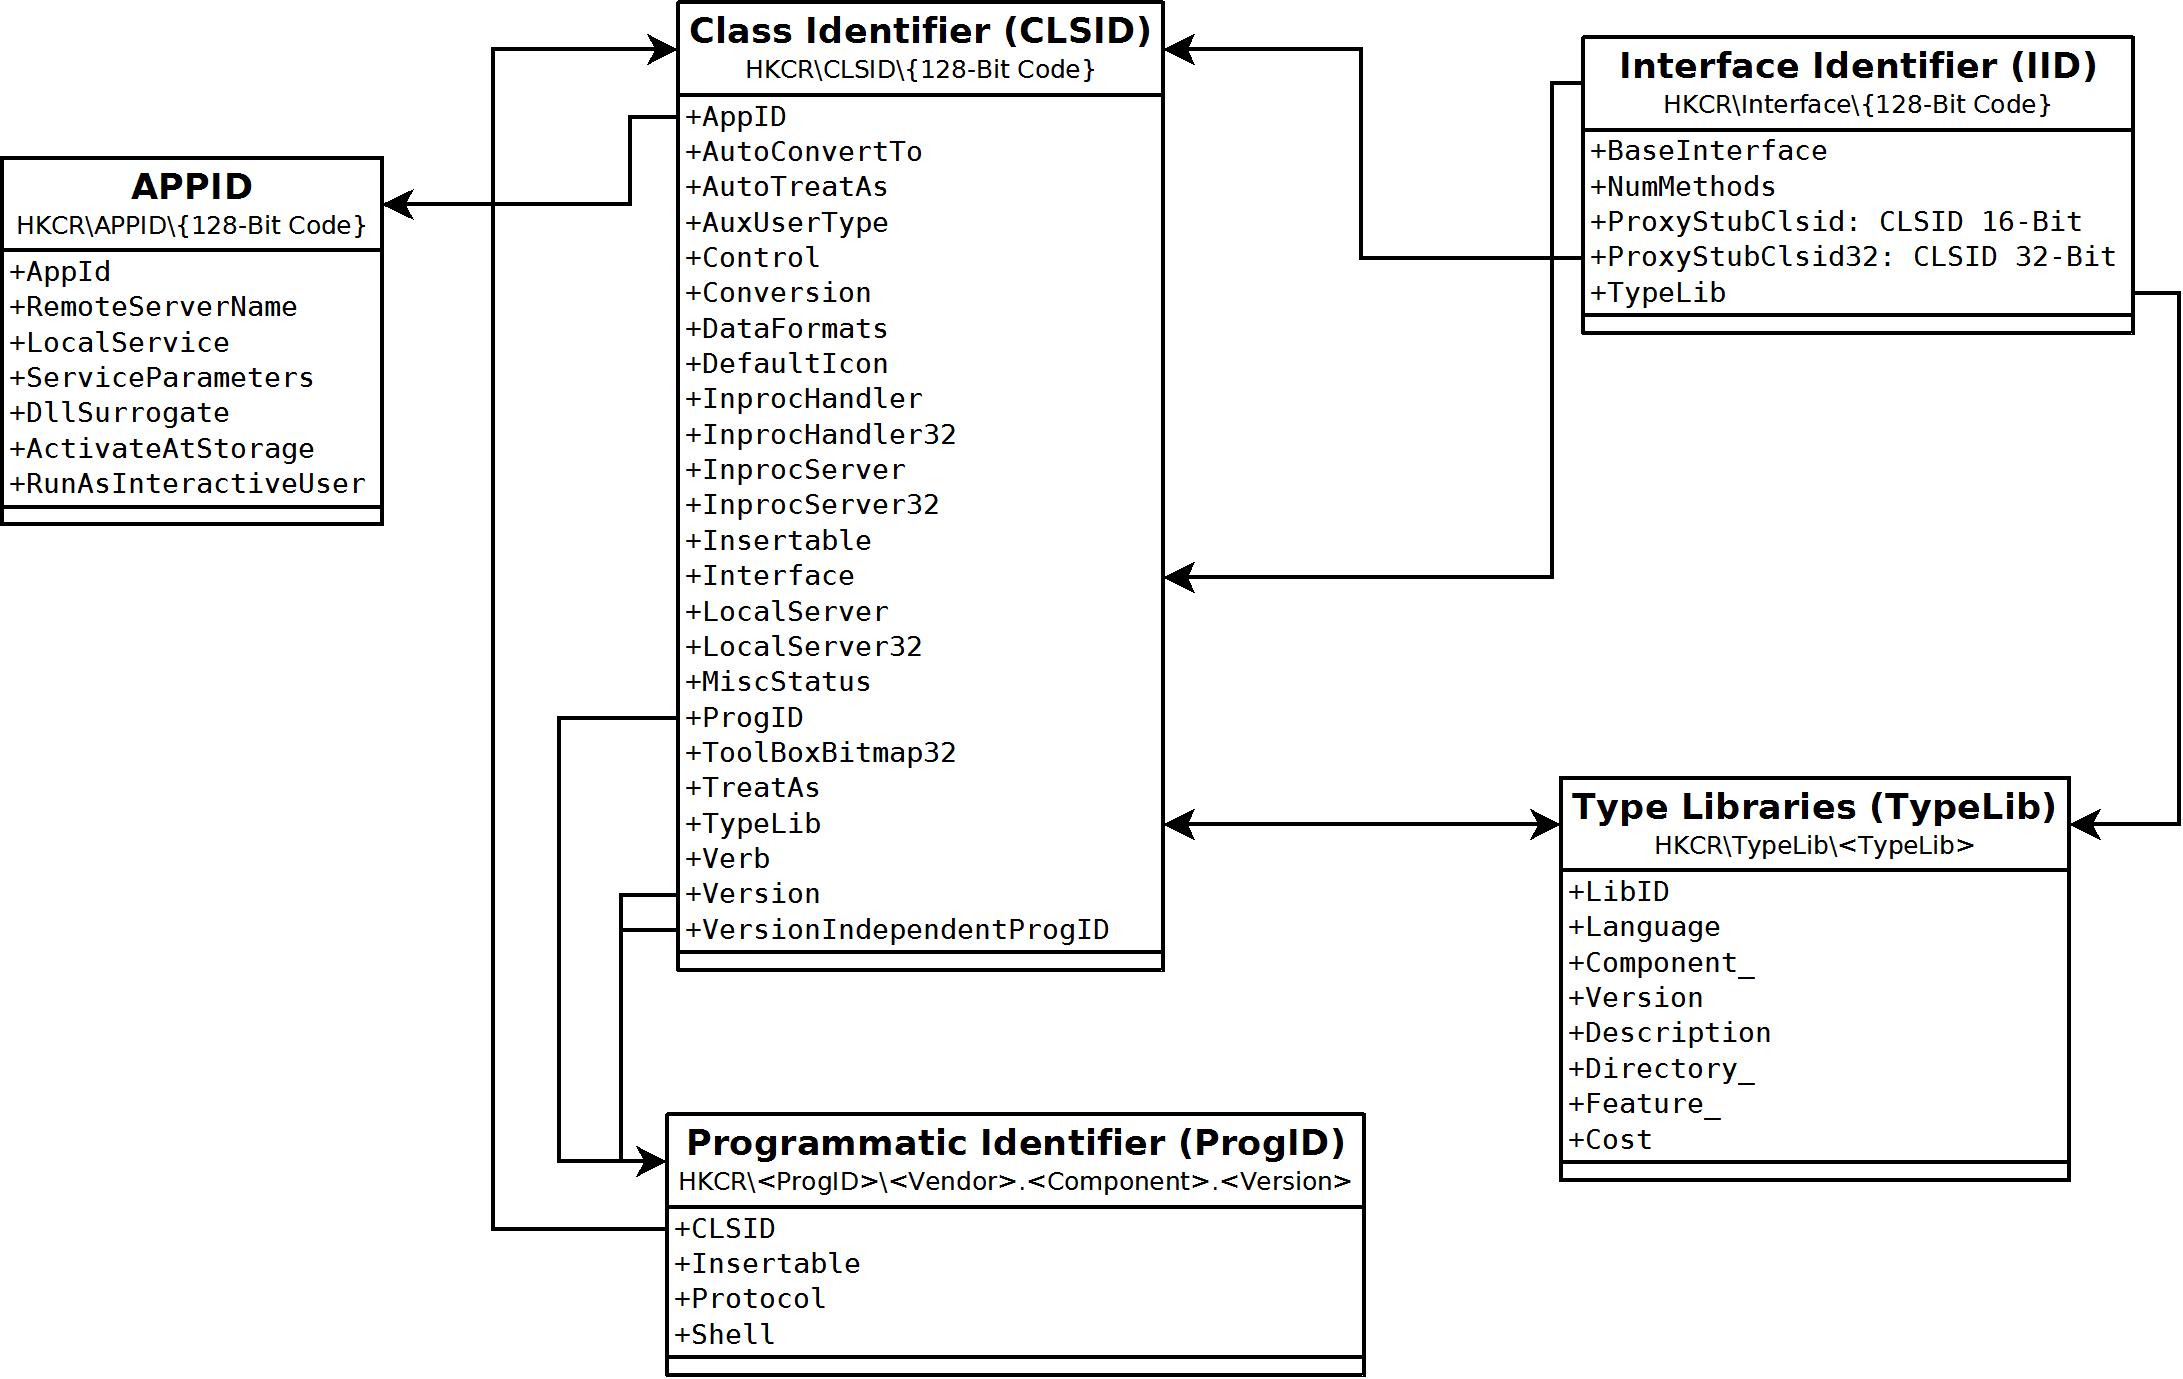
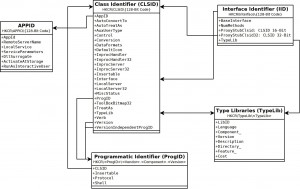
CLSID

A CLSID (class identifier) is a globally unique identifier that identifies a COM class object.  The CLSID is a 128-bit number, spelled in hexadecimal format, within a pair of braces.

One of the following values must exist to instruct the system where to find the component:

 HKEY_CLASSES_ROOT\CLSID\<CLSID> (default) = <human-readable class name>
 HKEY_CLASSES_ROOT\CLSID\<CLSID>\LocalServer = <full path to 16-bit file>
 HKEY_CLASSES_ROOT\CLSID\<CLSID>\LocalServer32 = <full path to 32-bit file>
 HKEY_CLASSES_ROOT\CLSID\<CLSID>\InprocServer = <full path to 16-bit file>
 HKEY_CLASSES_ROOT\CLSID\<CLSID>\InprocServer32 = <full path to 32-bit file>

On 64-bit Windows, 64- and 32-bit in-process servers uses the InprocServer32 entry.

Other optional values include:

 HKEY_CLASSES_ROOT\CLSID\<CLSID>\DefaultIcon = <path to file, icon index #>
 HKEY_CLASSES_ROOT\CLSID\<CLSID>\Insertable
 HKEY_CLASSES_ROOT\CLSID\<CLSID>\Interface
 HKEY_CLASSES_ROOT\CLSID\<CLSID>\ProgID = <ProgID>

ProgID

The ProgID (programmatic identifier), is a Registry entry that can be associated with a CLSID. The format of a ProgID is <Vendor>.<Component>.<Version>, separated by periods and with no spaces, as in Word.Document.6. Like the CLSID, the ProgID identifies a class, but with less precision. The ProgID is stored under the following registry key:

 HKEY_CLASSES_ROOT\<ProgID>
 HKEY_CLASSES_ROOT\<ProgID>\(default) = <human-readable component name>
 HKEY_CLASSES_ROOT\<ProgID>\CLSID(default) = <CLSID>

There are also version-independent program ID’s with the format <Program>.<Component>, as follows:

 HKEY_CLASSES_ROOT\<Versionless-ProgID>
 HKEY_CLASSES_ROOT\<Versionless-ProgID>\CLSID = <CLSID>
 HKEY_CLASSES_ROOT\<Versionless-ProgID>\CurVer = <ProgID>

Interface

COM uses the word interface in a sense different from that typically used in Visual C++ programming. A C++ interface refers to all of the functions that a class supports and that clients of an object can call to interact with it. A COM interface refers to a predefined group of related functions that a COM class implements, but a specific interface does not necessarily represent all the functions that the class supports.

If the component needs to register an interface, it requires the following syntax:

 HKEY_CLASSES_ROOT\Interface\<IID>
 HKEY_CLASSES_ROOT\Interface<IID>\BaseInterface
 HKEY_CLASSES_ROOT\Interface\<IID>NumMethods
 HKEY_CLASSES_ROOT\Interface\<IID>\ProxyStubCLSID or ProxyStubCLSID32 = <CLSID>

TypeLib

Type libraries are files that explicitly describe some or all of the contents of components. This includes information about the methods, properties, constants, and other members exposed by the component. The following Registry keys are also set in this case:

 HKEY_CLASSES_ROOT\Interface\<IID>\TypeLib\(default) = <TypeLib>
 HKEY_CLASSES_ROOT\TypeLib\<TypeLib>\<#.#>\<#>\<Platform>\(default) = <path to .TLB file>

notes:

If your typelib isn’t locale-specific, you can specify 0 for the <LCID>.

<Platform> can be win32, win64 or win16 depending on the platform of the binary.

 AppID

The AppID concept was introduced as part of the security support in COM. The AppID essentially represents a process that is shared by multiple CLSIDs. All objects in this process share the same default security settings.

DCOM provides mechanisms to externally configure security settings for objects and clients. In the current implementations of DCOM all security policies are enforced at the process level. All objects in a process share the same security policies, unless they programmatically override them. To match this process-wide security configuration, DCOM introduces the concept of an AppID.

AppIDs group the configuration options for one or more DCOM objects into one centralized location in the registry. COM objects hosted by the same executable must map into the same AppID. In-process COM objects that are run in a surrogate process can be forced into the same process by assigning the same AppID to their CLSID entries.

The AppID is a string which looks like a filename, e.g. “MYAPP.EXE”.

 HKEY_CLASSES_ROOT\AppID\<AppID>
 HKEY_CLASSES_ROOT\AppID\<AppID>\AppID = <AppID>
 HKEY_CLASSES_ROOT\AppID\<AppID>\DllSurrogate or DllSurrogateExecutable = <path to file>
 HKEY_CLASSES_ROOT\AppID\<AppID>\LocalService and ServiceParameters

Registering COM Component in a MSI

Windows Installer Best Practices does not recommend using the SelfReg and TypeLib table to register a COM Component.
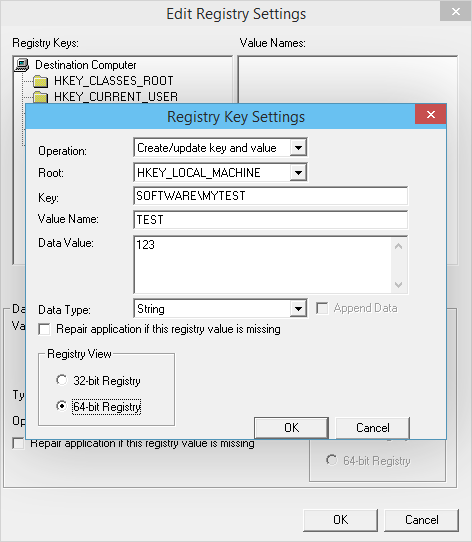
Instead use the registry table to add the COM registration information.

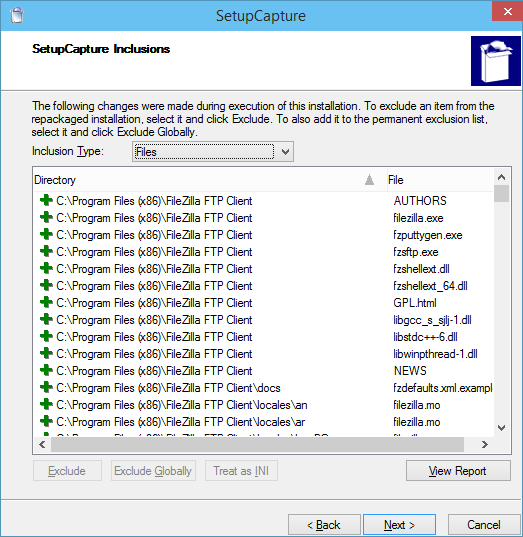
To get the registration information use any “Registry Capturing tool” like RegShot to capture the registry keys. The captured registry keys should be imported into the registry table in the MSI.

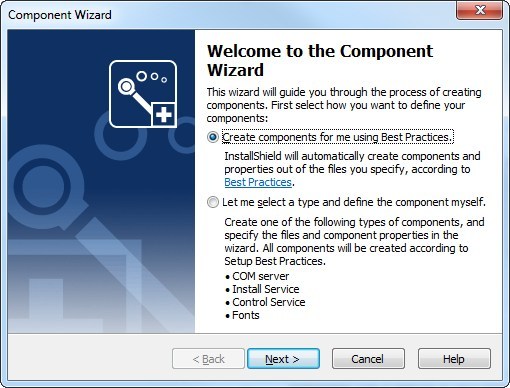
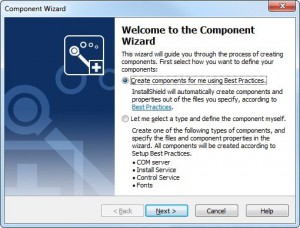
The AdminStudio Software Packaging Tool contains a “Component Wizard” which automatically extracts the necessary informations and implements into the installation.
spablog5


The Future of COM Components

The trend is increasingly towards .NET Framework.
The .NET Framework provides bi-directional interoperability with COM, which enables COM-based applications to use .NET components and .NET applications to use COM components.

Good to know that .NET relies on COM+ for its enterprise features.  At least for the time being these technologies are complimentary.  And COM is one of the core technologies that is not going away any time soon either, although from the client’s perspective, there will be more and more .NET managed APIs exposed over time, which will provide developer with a choice of interfaces.