Author Archives: Fabio.dilorenzo

Windows 8 – Rumors and more from around the web

the official release of the developer build version of Windows 8 led to many concerns regarding the future of the “software deployment” as we know it.

This article should help you to address these concerns in a Q&A style:

Whats new in Windows Installer for Windows 8?

Regarding to Bob Arnson (http://goo.gl/yZRi1) nothing signifant has changed in the Windows 8 Window Installer Header Files. The only major change seems to be the support of “ARM” as an Architecture Flag.

What is Metro?

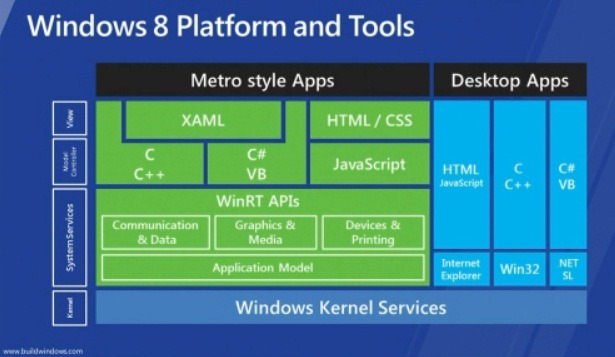
Metro is the new ” typography-based design language” (Wikipedia) which will be featured on top of our well known windows desktop. It is basically an UI style & Application Framework which is optimized for Tablet PC’s.

Together with Metro Microsoft is introducing the new “Windows Runtime” which will be used together with those new Metro Style Apps.

(Source: http://goo.gl/13PUi)

Whats is AppX?

AppX is the new deployment/packaging format for Windows 8 Metro Style Apps. AppX Packages can only be deployed by using the Windows Store which will be introduced with Windows 8.

Enterprise Customers however will be able to sideload AppX apps (http://goo.gl/fIez6)

Will AppX supersede Windows Installer?

No. AppX can only be used for deploying Metro Style Apps. Windows Installer will stay the primary solution for “classic desktop applications.”

Will there be any packaging software for AppX?

Probably not. Visual Studio 2012 already includes all required tools to produce an AppX Container/Package. Microsoft is trying to simplify the deployment process for metro style apps and did therefore e.g not include any sort of “custom actions” in it. The package creation is part of the development process in Visual Studio.



Wise Package Studio Versions

Ever wondered with which version of Wise Package Studio a msi has been built?

For this reason we have setup a comprehensive list of all known Wise Package Studio builds since 6.0:

Version Official Name Remarks
4.62.0.54 Wise Package Studio 4.62 RTM
5.60.0.466 Wise Package Studio 5.6 RTM
5.60.0.467 Wise Package Studio 5.6 Hotfix 1 RTM
6.0.0.231 Wise Package Studio 6.0 RTM
6.1.0.281 Wise Package Studio 6.01 RTM
6.1.0.285 Wise Package Studio 6.1 SP1 RTM
6.10.0.450 Wise for Windows Installer 6.1 RTM
6.20.0.281 Wise for Windows Installer 6.20 RTM
7.0.0.480 Wise Package Studio 7.00 RTM
7.1.0.599 Wise Package Studio 7.00 SP1 RTM
7.2.0.31 Wise Package Studio 7.00 SP2 RTM
7.3.0.256 Unknown Internal Build
7.3.0.270 Unknown Internal Build
7.3.0.385 Wise Package Studio 7.00 SP3 RTM
8.0.0.69 Wise Package Studio 8.00 RTM

The Version used to compile the MSI will usually be saved in the “WiseEditorVersion” property:


SVS/SWV: Non Virtual Application may perform very slow while at least 1 virtual layer is active

Symptom

A software package which is non virtual may perform very slow.

Solution / Workaround

Even non-virtual application are being redirected through the SVS/SWV Filesystem Minidriver while at least 1 virtual layer is active on the system.

This may significantly slow down applications with many registry/file system I/O operations. (e.g bad performance at startup)

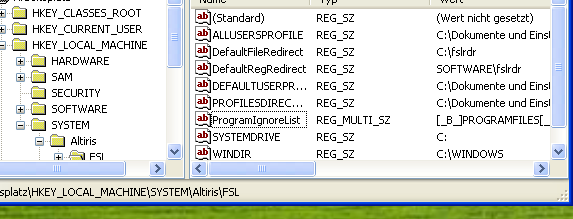
To work around this issue you can add those application to the SVS Program Ignore list which you may find at the following location:

HKLMSystemAltirisProgramIgnoreList (REG_MULTI_SZ)

However bear in mind that those applications will no longer see any virtualized resources.

How to repackage a NDIS driver

Several months ago I met a new challenge in shape of a device driver I’ve never seen before called…

NDIS – Network Driver Interface Specification.

I dont want to loose much time with talking about the “driver type” itself, because you can get all information from a well written wikipedia article.

Such a driver usually consists of the very typical driver files:

Inf File, Cat File & Sys File. Everything signed as you might expect of course.

My first attempt was to install the driver the “Ontrex Best Practices” way which usually means either to use the difxapp merge module or the dpinst.exe executable (custom action).

Unfortunately, none of them led to to same result as the original package had behave.

After googling around a bit I finally came to the tipping point: netcfg.exe

This executable is present on every windows at least since windows 2000 and basically helps you to automate any “Network Card” related installation tasks like

– Installing/servicing/uninstalling Network Protocols (e.g. Internet Protocol Version 4 (TCP/IPv4)

– Installing/servicing/uninstalling Network services (e.g. QoS Packet Scheduler)

– Installing/servicing/uninstalling Network Clients (e.g. Client for Microsoft Networks)

Kindly asked the program offers me the following command line parameters:

So the last missing information in the puzzle is how do I know the component id for my driver?

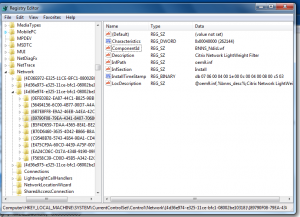
Solution was simple: I had installed the original package and searched through the registry  using the INF Filename and this offered me the following result:


Now I had all required information to schedule a custom action in my package to install the driver.

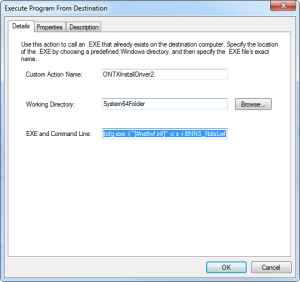
Because netcfg.exe is already on every windows installation I used the type “Execute Program From Destination” (MSI SDK: Custom Action Type 34)

[System64Folder]netcfg.exe -l “[#netlwf.inf]” -c s -i BNNS_NdisLwf

In our case the target operating system  was a x64 OS and therefore we needed to specify the [System64Folder].

Because the action changes the system state it logicaly belongs to the “deferred” installation sequence.


Ontrex Best Practices Part II – ProductVersion

Our Ontrex Best Practices series continues with a very underestimated topic.

We are talking about the ProductVersion Property today.  As many of you already may know the property has to be formatted as follows:

major / minor / build 255.255.65535 (Source: http://goo.gl/Dj3l2)

Usually when we are repackaging we try to adapt the original Product Version as good as possible. But Unfortunately sometimes the vendor’s intended product version does not really fit in this schema which causes several problems like

  • Not possible to take over the version at all (eg. 2010.10.10) because it simply doesnt fit into the maxium values of 255.255.65535
  • They only increment the fourth field which is simply non-existent in Windows Installer
  • They add some strange leading zeros into some fields (Why?)

We have now enforced some general guidelines regarding this to encounter any problems which may be caused by those strange vendor habits:

  1. We only keep the first three  fields of any original product version (e.g 10.3.181.14 becomes 10.3.181), Major Upgrade is still possible (however limited) but causes an ICE error. Joining 2 fields together is strictly forbidden.
  2. Leading zero’s have to be eliminated from any field (e.g 1.09.10 becomes 1.9.10)
  3. Any non fitting Product version will be resetted to 1.0.0 (eg. 2010.23.1)

To conclude my blog article i really want to appeal to all developers out there:

Please try to adapt the windows installer product version schema. And avoid, at all costs, having only incremented the fourth field for any reasons. The fourth field should, if present, be used as build number only.

Therefore my recommendation for a versioning schema is as follows:

Major Release(255) . Feature Enhancements (255) .  Bugfixes / Patches (65535) . Build Number (Unrelevant and ignored by Windows Installer anyway)

And, of course, do not use any kind of date for the versioning schema! 🙂


Why you should keep your Cabinets outside the MSI

At first most customers insist of keeping the cabinet files inside the Windows Installer Database.

It may sound reasonable for the time being because you have to deal with lesser file count, but if you have a deeper look into the windows installer mechanics you will soon see some big disadvantages.

Its faster!

When deploying/installing/repairing a msi file/installation with multiple cab files it will be much faster than with only one file. Why? Its simple: Only the required cabinet files will be accessed and this results in less file i/o & less traffic (network share)

It will be cached from Windows 7 onwards

As many of you already may know microsoft introduced a new caching behaviour with Windows Installer 5.0.

Due to signing/certification issues cabinet files will no longer be stripped out before being placed into the Windows Installer Cache directory (C:WindowsInstaller).

This results in much more useless occupied disk space by Windows Installer Packages which are mostly cached anyway by the Deployment System.


Wise Package Studio excludes *.swp files per default.

During packaging a very common software we ran against the problem that SetupCapture did not capture all files in the installation.

After some investigation we found out that WPS exludes *.swp and other file extensions per default. This however may lead to incomplete snapshot results.

We therefore recommend to remove any file extensions entry from your SetupCapture Configuration which apply to ‘all directories’ :

However if you dont want to exclude those entries permanently you may include them on a per snapshot basis on the “SetupCapture Exclusions” screen.


Managed Office Addins

Als Managed Office Addins bezeichnet man in .NET entwickelte Erweiterung für die Office Suite. In diesem Artikel gehen wir auf einige wissenswerte Informationen ein.
Per User Addin -> ONLY!
In Office 2007 konnte man “Managed Office Addins” bisher nur auf per User Basis installieren. Für jeden Setup Author /Repackager in “Multi-User” Umgebungen eine wahre Katastrophe.
In Office 2010 hat Microsoft die uns erhöhrt und erlaubt per Machine “Managed Office Addins”. Und das allerschönste? Per (optionaler)Patch und Registry Tweak funktioniert dies nun auch unter Office 2007.
Troubleshooting
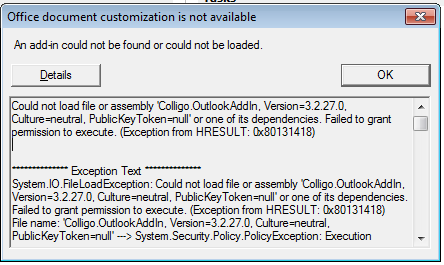
Das Addon disabled sich sofort und keine Ahnung warum? Mittels einfacher Environment Variabel macht man “Managed Office Addins” sehr gesprächig.
Man erfasst folgende Environment Variable (oder setzt sie bevor man die Office Applikation startet).
VSTO_SUPPRESSDISPLAYALERTS = 0
Und schon sind die Addins informationsfreudiger:
Quellen:

ActiveSetup unter x64 Betriebsystem

Ein in der Repaketierung sehr beliebtes Instrument um “Per-User” Resourcen zu installieren stellt das ActiveSetup dar.

Wer erwägt seine MSI-Pakete ebenfalls auf einem x64 OS zu installieren muss diesen allerdings doppelt erfassen.  Wieso fragen Sie sich sicher?

Das Problem liegt im Detail: Die Windows Shell auf einem x64 Betriebsystem ist natürlich, überraschung ein 64-Bit Prozess,  und der Active-Setup Registry Bereich ist gemäss Microsoft kein “gesharter” Key Bereich. Daher wird beim Logon-Prozess nur der x64 Bereich “abgearbeitet”.

Eine saubere und TerminalServer-Aware Lösung für dieses Problem sieht wie folgt aus:

Die Komponente für das ActiveSetup wird doppelt implementiert, und einmal mit aktivierten “64-Bit Component” Flag, damit die Registry Keys auch definitiv im 64-Bit Bereich geschrieben werden.

Da Registry Keys jeweils nur zu einer Komponente gehören dürfen, müssen diese natürlich doppelt erfasst werden:

Ansonsten gelten natürlich die üblichen ActiveSetup Best Practices. Und um es nochmals definitiv klarzustellen: Diese Implementation wird auch bei x86-Paketen benötigt.


Microsoft APP-V 4.6 SP1 – Web Artikel

Mit dem Release des Service Packs 1 für Microsoft Application Virtualization 4.6 sind auch einige neue technische Artikel im Web erschienen.

In diesem Artikel fassen wir die wichtigsten zusammen:

Das offizielle “Changelog” von Microsoft kann sich unter folgendem Link ansehen: