Category Archives: Windows Installer

Active Setup and Per-User/Per-Machine registry

The Windows Installer allows you to create a setup which will dynamically writes registry keys into either  HKCU or HKLM. This behaviour is then controlled by the “ALLUSERS” Property.

The Windows Installer Help describes this feature as follow:

 Constant  Hexadecimal  Decimal  Root key
 (none)  – 0x001  -1  If this is a per-user installation, the registry value is written under HKEY_CURRENT_USER.If this is a per-machine installation, the registry value is written under HKEY_LOCAL_MACHINE. Note that a per-machine installation is specified by setting the ALLUSERS property to 1.

We will now provide an example to illustrate this behaviour:

reg01


In this MSI I have chosen the “AppDataFolder” system property as Value  in order to check the resolved path. The path will be different for each user because its an per-user defined system property.

If you install this key with the ALLUSERS Property set to “1” the result will be as following:

[HKEY_LOCAL_MACHINE\SOFTWARE\Ontrex\Example]
"UserOrMachine"="C:\Users\Administrator\AppData\Roaming\"

The key will be installed into HKLM however the property will be resolved according to the current installing user.

If you install this application again with ALLUSER set to “2”  the result will look like this:

[HKEY_CURRENT_USER\Software\Ontrex\Example]
"UserOrMachine"="C:\Users\test\AppData\Roaming\"

More details about this behaviour/feature can be obtained from the following MSDN Article:

http://blogs.msdn.com/b/windows_installer_team/archive/2009/09/02/authoring-a-single-package-for-per-user-or-per-machine-installation-context-in-windows-7.aspx

Conclusion: The registry root parameter can be used to dynamically write the registry keys into HKCU or HKLM  based on the current installation context (Per-User <> Per-Machine)

But what happens if you have a per machine installation which contains an active setup mechanism?

Let’s have a deeper look into it:

We add all corresponding registry keys, features and components to the MSI  which are required  for a fully functional Active Setup.

Now let’s install the MSI under system account with ALLUSER=1 and check the example registry key.

The Result is:

[HKEY_LOCAL_MACHINE\SOFTWARE\Ontrex\Example]
"UserOrMachine"="C:\Windows\system32\config\systemprofile\AppData\Roaming\"

Now log off and log on with a standard user account and check the key again and something unexpected happened. As you see the key changed to:

[HKEY_LOCAL_MACHINE\SOFTWARE\Ontrex\Example]
"UserOrMachine"="C:\Users\test\AppData\Roaming\"

What happend?

The Property ALLUSERS sets the installation to a  machine installation and the Active Setup will be execute with the following option “/fu” (all required user-specific registry entries).

Answer:
During the active setup the windows installer will repair the MSI in User Context and only user-specific registry keys will be rewritten (“/fu” parameter). All “-1” however are simply considered as “user based keys” even the ALLUSERS property is set to “1”. Because the repair works with elevated priviliges this HKLM key will now be rewritten using the current users [AppDataFolder] value.

Our conclusion

We will kindly advice you not to use “-1” in the root column of the Registry table in a windows installer database in conjunction with active setup. Also bear that in mind when you are adding activesetup to an existing vendor msi (Transform).

Regards,

SPA Team

COM Components

The Component Object Model (COM) is a technology developed by Microsoft to enable Windows interprocess communication and dynamic object creation. COM Objects are language independent and can be implemented in any development language which has a compiler that can compile the approriate code, such as C++.

Typical examples of compiled code are:

  • DLL (Dynamic Linking Library)
  • OCX (ActiveX control)
  • TLB (Type Libraries)
  • EXE (Executables)

The access to the funtionality of a COM Object takes place through an interface, which allows the functions offered by the COM Object.

Using the “REGSVR32.EXE” Tool the most common binaries such as DLL and OCX can be registered. Thereby new class IDs are created in the registry database that refer to the relevant binary file. Thus, their functions can now be used on Windows and programs access the class IDs to perform required functions.


Examples registering compiled codes:

In case of DLL/OCX

To register a DLL or OCX, use regsvr32.exe as follows:

  1. Select Start -> Run
  2. In the dialog box, type the following:

Regsvr32 <full path of DLL or OCX to be registered>

For example, “regsvr32 C:\Windows\System32\msaatext.dll” would register the library named msaatext.
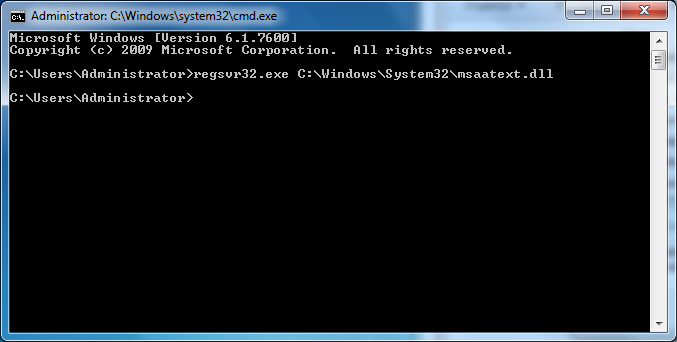
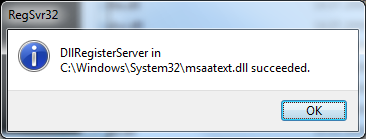
If successful, you’ll see the message:
 

Why not all DLL’s can be registered

A DLL needs to be specifically written to be used with the regsvr32 command to register.
The DLL must implement DllRegisterServer and DllUnregisterServer, which contain the logic that is necessary to add or delete the required registry entries for the COM component. RegSvr32 finds the entry point to these functions, and calls them appropriately.
If the DLL was not written to be used with regsvr32 then the conventional entry point will not be found, and you get an error message.


In case of TLB

To register a type library, use regtlib.exe.

  1. Select Start -> Run
  2. In the dialog box, type the following

Regtlib <full path to the type library>

For example, “regtlib C:\Program Files\MyApp\MyTypeLib.tlb” would register the library MyTypeLib.

If successful, a dialog box similar to the one shown for the DLL will appear.

In case of EXE

To register an EXE:

  1. Select Start -> Run
  2. In the dialog box, type the following:

<Full path of the EXE file> /RegServer

For example, “C:\Program Files\myAPP\MyEXE.exe /RegServer” will register the Executable MyExe.exe.


Different Types of registration Keys
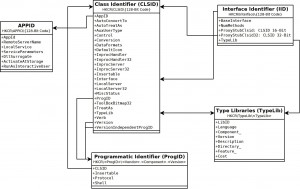
components


Below you find some registry keys in relation with com components and its explanations.

CLSID

A CLSID (class identifier) is a globally unique identifier that identifies a COM class object.  The CLSID is a 128-bit number, spelled in hexadecimal format, within a pair of braces.

One of the following values must exist to instruct the system where to find the component:

 HKEY_CLASSES_ROOT\CLSID\<CLSID> (default) = <human-readable class name>
 HKEY_CLASSES_ROOT\CLSID\<CLSID>\LocalServer = <full path to 16-bit file>
 HKEY_CLASSES_ROOT\CLSID\<CLSID>\LocalServer32 = <full path to 32-bit file>
 HKEY_CLASSES_ROOT\CLSID\<CLSID>\InprocServer = <full path to 16-bit file>
 HKEY_CLASSES_ROOT\CLSID\<CLSID>\InprocServer32 = <full path to 32-bit file>

On 64-bit Windows, 64- and 32-bit in-process servers uses the InprocServer32 entry.

Other optional values include:

 HKEY_CLASSES_ROOT\CLSID\<CLSID>\DefaultIcon = <path to file, icon index #>
 HKEY_CLASSES_ROOT\CLSID\<CLSID>\Insertable
 HKEY_CLASSES_ROOT\CLSID\<CLSID>\Interface
 HKEY_CLASSES_ROOT\CLSID\<CLSID>\ProgID = <ProgID>

ProgID

The ProgID (programmatic identifier), is a Registry entry that can be associated with a CLSID. The format of a ProgID is <Vendor>.<Component>.<Version>, separated by periods and with no spaces, as in Word.Document.6. Like the CLSID, the ProgID identifies a class, but with less precision. The ProgID is stored under the following registry key:

 HKEY_CLASSES_ROOT\<ProgID>
 HKEY_CLASSES_ROOT\<ProgID>\(default) = <human-readable component name>
 HKEY_CLASSES_ROOT\<ProgID>\CLSID(default) = <CLSID>

There are also version-independent program ID’s with the format <Program>.<Component>, as follows:

 HKEY_CLASSES_ROOT\<Versionless-ProgID>
 HKEY_CLASSES_ROOT\<Versionless-ProgID>\CLSID = <CLSID>
 HKEY_CLASSES_ROOT\<Versionless-ProgID>\CurVer = <ProgID>

Interface

COM uses the word interface in a sense different from that typically used in Visual C++ programming. A C++ interface refers to all of the functions that a class supports and that clients of an object can call to interact with it. A COM interface refers to a predefined group of related functions that a COM class implements, but a specific interface does not necessarily represent all the functions that the class supports.

If the component needs to register an interface, it requires the following syntax:

 HKEY_CLASSES_ROOT\Interface\<IID>
 HKEY_CLASSES_ROOT\Interface<IID>\BaseInterface
 HKEY_CLASSES_ROOT\Interface\<IID>NumMethods
 HKEY_CLASSES_ROOT\Interface\<IID>\ProxyStubCLSID or ProxyStubCLSID32 = <CLSID>

TypeLib

Type libraries are files that explicitly describe some or all of the contents of components. This includes information about the methods, properties, constants, and other members exposed by the component. The following Registry keys are also set in this case:

 HKEY_CLASSES_ROOT\Interface\<IID>\TypeLib\(default) = <TypeLib>
 HKEY_CLASSES_ROOT\TypeLib\<TypeLib>\<#.#>\<#>\<Platform>\(default) = <path to .TLB file>

notes:

If your typelib isn’t locale-specific, you can specify 0 for the <LCID>.

<Platform> can be win32, win64 or win16 depending on the platform of the binary.

 AppID

The AppID concept was introduced as part of the security support in COM. The AppID essentially represents a process that is shared by multiple CLSIDs. All objects in this process share the same default security settings.

DCOM provides mechanisms to externally configure security settings for objects and clients. In the current implementations of DCOM all security policies are enforced at the process level. All objects in a process share the same security policies, unless they programmatically override them. To match this process-wide security configuration, DCOM introduces the concept of an AppID.

AppIDs group the configuration options for one or more DCOM objects into one centralized location in the registry. COM objects hosted by the same executable must map into the same AppID. In-process COM objects that are run in a surrogate process can be forced into the same process by assigning the same AppID to their CLSID entries.

The AppID is a string which looks like a filename, e.g. “MYAPP.EXE”.

 HKEY_CLASSES_ROOT\AppID\<AppID>
 HKEY_CLASSES_ROOT\AppID\<AppID>\AppID = <AppID>
 HKEY_CLASSES_ROOT\AppID\<AppID>\DllSurrogate or DllSurrogateExecutable = <path to file>
 HKEY_CLASSES_ROOT\AppID\<AppID>\LocalService and ServiceParameters

Registering COM Component in a MSI

Windows Installer Best Practices does not recommend using the SelfReg and TypeLib table to register a COM Component.
Instead use the registry table to add the COM registration information.

To get the registration information use any “Registry Capturing tool” like RegShot to capture the registry keys. The captured registry keys should be imported into the registry table in the MSI.

The AdminStudio Software Packaging Tool contains a “Component Wizard” which automatically extracts the necessary informations and implements into the installation.
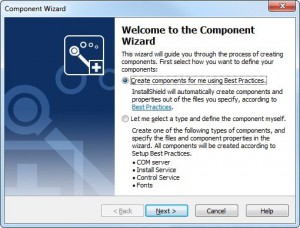
spablog5


The Future of COM Components

The trend is increasingly towards .NET Framework.
The .NET Framework provides bi-directional interoperability with COM, which enables COM-based applications to use .NET components and .NET applications to use COM components.

Good to know that .NET relies on COM+ for its enterprise features.  At least for the time being these technologies are complimentary.  And COM is one of the core technologies that is not going away any time soon either, although from the client’s perspective, there will be more and more .NET managed APIs exposed over time, which will provide developer with a choice of interfaces.


ICE27 Error Unknown Action: MsiConfigureServices on AdminStudio 2012 SP2

The newest .CUB File from Admin Studio 2012 SP2 contains an error. As you can see if you validate a MSI Package:

28.03

 This error message is not really an error from the validated MSI and can be ignored but it’s not very beautiful to get this error on every validation.

There is only one new line needed inside the CUB File (which contains the validation rules) and it can be fixed very fast:

You need the actual darice.cub file to modify the validation rules, this file can be found here:

“C:Program Files (x86)InstallShield2012SpringSupportValidationdarice.cub”

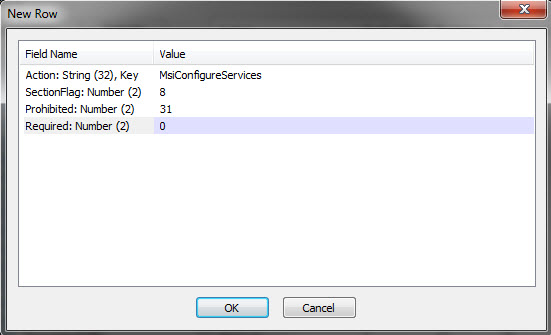
Open this file with a standard Windows Installer Editor (Insted or Orca) and go to the table _Action. Add a new row into this table with the following options:

MsiConfigureServices

Action: MsiConfigureServices
SectionFlag: 8
Prohibited: 31
Required: 0

Save and close the darice.cub file.

28.03_002


You should no longer receive  this validation error.


Windows 8 SDK (contains newest Windows Installer SDK 5.0)

The newest darice.cub, where this changes are already applied, is also available on the following page:

http://msdn.microsoft.com/en-US/windows/desktop/hh852363.aspx

Download the SDK and install the newest Version of Orca. You will find the darie.cub inside the main installation folder. Replace this one with the old validation file inside the InstallShield Directory.

Regards,

SPA Team


Ontrex SPA YouTube Channel

We are happy to announce our newest service addition for our customers.

The Ontrex SPA Software Packaging Channel

As from now we are excited to publish free youtube tutorials/casts in several packaging disciplines/tools like AdminStudio, APP-V & Wix.

We will also cover any topics about the recent EOL announcement of Wise Package Studio including but not limited to “Migration to AdminStudio” casts.

Regards,

SPA Team

REMOVE Kondition – Die Wahrheit

Als ich kürzlich den Artikel Test your conditions von Heath Stewart gelesen habe, wusste ich sogleich, dass es nun an der Zeit ist die letzten technischen Details über die REMOVE Kondition preis zu geben.

Wie die REMOVE Kondition optimal eingesetzt wird entscheidet die Feature Struktur eines Produktes. Eine einfache Aussage wie REMOVE~=”ALL” zu verwenden, ist keine gute Idee, da es Situationen gibt, wo diese Kondition nicht greift.

Fact ist, dass die REMOVE Kondition im Falle einer Deinstallation verwendet werden kann.
Fact ist, dass bei einer repaketierten Applikation, im Generellen die Kondition REMOVE verwendet werden kann.

Der Ausdruck REMOVE~=”ALL” hat sich über ein Jahrzehnt stark verbreitet. Der Wert ALL bedeutet, dass alle Features eines Produktes deinstalliert werden, sprich die Installation wird komplett deinstalliert. Dies ist die allgemeine Annahme in der Software Paketierung.

REMOVE~=”ALL” wird jedoch nicht in allen Situationen funktionieren, wie es Heath Stewart schon angedeutet hat. Es gibt eine Situation, den Wartungsmodus um es genau zu benennen, wo diese Kondition nicht greift. Betroffen davon sind besonders Software-Entwickler, da dessen Deinstallationen öfters mit dem Wartungsmodus durchgeführt werden und von diesem Problem betroffen sind.

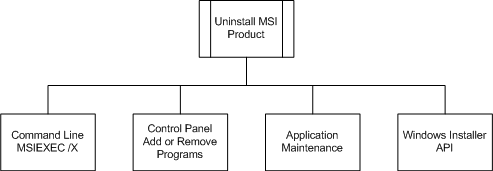
Ein Produkt  kann über folgende vier Wege deinstalliert werden.

Deinstallation mittels Befehlszeile (msiexec.exe -x <product code> /qb) wie gewöhnlich ein Produkt automatisch deinstalliert wird:
MSI (s) (28:5C): Command Line: REMOVE=ALL
Property(S): REMOVE = ALL

Deinstallation über Control Panel > Add or Remove Programs, wie es ein Endanwender eine Deinstallation durchführen wird:
MSI (s) (28:F8): Command Line: REMOVE=ALL
Property(S): REMOVE = ALL

Deinstallation über den Wartungsmodus einer MSI Installation (Modify, Repair oder Remove Option im Setup Wizard)
MSI (s) (28:5C): Command Line:
MSI (c) (28:1C): Switching to server: REMOVE=Complete
MSI (s) (28:10): PROPERTY CHANGE: Adding REMOVE property. Its value is ‘Complete’.
MSI (s) (28:10): PROPERTY CHANGE: Modifying REMOVE property. Its current value is ‘Complete’. Its new value: ‘ALL’.
Property(S): REMOVE = ALL

Deinstallation über die Windows Installer API
MSI (s) (28:EC): Command Line: REMOVE=ALL
Property(S): REMOVE = ALL

Es wird nun ersichtlich, das eine Deinstallation über den Wartungsmodus anders abläuft als die restlichen Deinstallationswege. Beim Wartungsmodus steht es von beginn an nicht fest, welche Windows Installer Aktion der Anwender ausüben wird. Daher kann die REMOVE Property nicht  von Beginn an definiert werden.
MSI (s) (28:5C): Command Line:

In der REMOVE Property stehen alle Feature Namen des aktuell installierten Produktes (Features werden mit ; getrennt falls mehrere installiert sein sollten).
MSI (c) (28:1C): Switching to server: REMOVE=Complete
MSI (s) (28:10): PROPERTY CHANGE: Adding REMOVE property. Its value is ‘Complete’.

Anhand der Windows Installer SDK steht fest, das der Remove Control Event das Argument ALL  dem REMOVE Property der Installations-Session weiter geben muss, damit das gesamte Produkt deinstalliert wird.
MSI (s) (28:10): PROPERTY CHANGE: Modifying REMOVE property. Its current value is ‘Complete’. Its new value: ‘ALL’.
Property(S): REMOVE = ALL

Entscheidend ist, die Action InstallValidate erkennt den Remove Control Event Eingriff  und ändert den Wert in der REMOVE Property auf ALL.

Dies bedeutet: Wird ein Produkt über den Wartungsmodus deinstalliert, so werden Konditionen mit dem Argument REMOVE~=”ALL” erst nach der InstallValidate Aktion funktionieren.

Sollte früher eine Aktion diese Kondition verwenden, so wird diese nicht ausgeführt.

Companion Files

Oft begegnet man in der Software Paketierung dem Problem, dass man eine unversionierte Datei ersetzen will, dies aber nicht immer auf Anhieb gelingt.

Der Grund ist meist schnell gefunden, die Datei wurde mittlerweile modifiziert oder aus anderen Gründen stimmt das Create/Modified Datum nicht mehr überein. Deshalb verhindern auch die Default File Versioning Rules das erfolgreiche Ersetzen der Datei.

Die Windows Installer Technologie bietet aber hierfür eine elegante Lösungsmöglichkeit an, welche leider oft in Vergessenheit gerät.

Companion Files, zu Deutsch: Begleit-Dateien, bezeichnet man Dateien in der Installation, bei denen man eine andere Datei als “Entscheidungsträger” definiert.

Beispiel:

Für userdata.usr (unversioniert) konfiguriert man “MyVersioned.dll” (versioniert) als “Entscheidungsträger”. Sofern MyVersioned.dll installiert wird (Beispiel: Höhere Version als bestehende MyVersioned.dll), wird auch userdata.usr installiert.

Wise Package Studio kann dies wie folgt realisiert werden:

  1. Man wechselt auf folgende Ansicht:
    “Setup Editor -> Tables -> File”
  2. Als nächster Schritt sucht man sich die unversionierte Datei heraus.
  3. Sobald man diese gefunden hat, öffnet man das DropDown Menu bei der Spalte “Version”.
    companion_files
  4. Bei der Spalte trägt man nun die gewünschte “Entscheidungsträger” Datei ein, diese sollte natürlich optimaler weise eine versionierte Datei sein.

Den Mechanismus in Aktion sieht man entsprechend in der Logfile:

File: C:Program FilesMyProjectuserdata.usr;    Overwrite;    Won’t patch;    Existing file is of an equal version    (Checked using version of companion: C:Program FilesMyProjectMyVersioned.dll)

Weiterführende Information gibt es natürlich wie immer im Windows Installer SDK:

http://msdn.microsoft.com/en-us/library/aa367997%28VS.85%29.aspx

Internal Error 2709

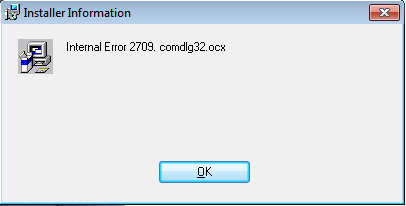
Die Windows Installer 2709 Fehlermeldung ist eine Benachrichtigung, die bei einer Update Installation erscheinen kann. Wird eine betroffene Installation auf einer Clean Machine installiert, so sieht alles gut aus, keine Fehlermeldung erscheint. Sollte die gleiche Installation als Update Installation durchgeführt werden, so erscheint die 2709 Fehlermeldung. Interessant dabei ist, das der Test auf einer Clean Machine eigentlich das gleiche Problem haben sollte, das Problem aber aus internen Abläufen der Windows Installer Session automatisch korrigiert wird.

2709

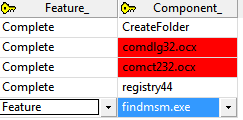
Das Problem kann unter anderem durch ein Setup-Capture mit Wise Package Studio entstehen, wenn Dateien mit Merge Modulen ersetzt werden. Wie in diesem Beispiel wurde die Datei comdlg32.ocx durch ein Merge Module von Microsoft ersetzt. Dieser Vorgang löscht jedoch nicht die Verweise der bereits erstellten Componenten in der FeatureComponents Tabelle.

FeatureComponent
Komponenten die während einem Setup-Capture mit einem Merge-Module ersetzt wurden, bleiben in der FeatureComponents Tabelle zurück

Das etwas mit diesen Komponenten nicht stimmt, wird in der Tabellenansicht des Windows Installer Editors ersichtlich. Werden diese Einträge übersehen, so wird auf diesen Misstand während der Validierung darauf hingewiesen:
Not a valid foreign key; Table: FeatureComponents, Column: Component_, Key(s): Complete.comdlg32.ocx ice03.html FeatureComponents Component_ Complete comdlg32.ocx
Evaluation: ICE03

Diese Einträge sind aus der FeatureComponents Tabelle zu löschen. Es kann jedoch vorkommen, das die Validierung aus unbekannten Gründen bei dieser Überprüfung fehlschlägt und keine Probleme angezeigt werden. Bei einem anschliessenden Testdurchlauf der Installation wird keine Fehlermeldung erscheinen, da die Windows Installer Session diese fehlerhaften Einträge überspringt.

Doing action: InstallValidate
Feature: Complete; Installed: Absent;   Request: Local;   Action: Local
Component: CreateFolder; Installed: Absent;   Request: Local;   Action: Local
Component: registry44; Installed: Absent;   Request: Local;   Action: Local
Component: findmsm.exe; Installed: Absent;   Request: Local;   Action: Local

Während der InstallValidate Aktion werden die betroffenen Komponenten ausgewählt, die fehlerhaften Einträge werden einfach übergangen.

Soweit scheint alles zu funktionieren, bis zu dem Tag, an dem mit der gleichen Installation ein Update durchgeführt wird. Bei einer Update Installation wird zusätzlich die MigrateFeatureStates Aktion durchgeführt. Diese überprüft die Stati der bereits Installierten Features und vererbt die Feature States bei der Update Installation (Die Vererbung von Feature Stati kann mit der Upgrade Tabelle deaktiviert werden). Die Aktion  MigrateFeatureStates übergeht  die fehlerhaften Einträge in der FeatureComponents Tabelle jedoch nicht und wird mit der Fehlermeldung 2709 die Installation abbrechen.

DEBUG: Error 2709:  The specified Component name (‘comdlg32.ocx’) not found in Component Table.

In diesem Fall sind in der Installation die fehlerhaften Einträge in der FeatureComponents Tabelle zu beheben. Wir empfehlen diese Überprüfung in die Best-Practices von Software-Paketierungs Guidelines aufzunehmen, um diesem Problem zuvor zukommen.

Verzeichnisverfügbarkeit bei Custom Actions

Nach den Regeln der alten Windows Installer Schule wird gelernt, das beim Einsatz von Custom Actions Verzeichnisse der Directory Tabelle erst nach der CostFinalize Aktion zur Verfügung stehen.
Demnach sollen Custom Actions, die mit Verzeichnis-Verweise arbeiten, erst nach der CostFinalize Aktion ausgeführt werden.

Die CostFinalize Aktion wird alle Verzeichnisse für die Windows Installer Session bereitstellen.
MSI (s) (F8:E8): Doing action: CostFinalize
MSI (s) (F8:E8): PROPERTY CHANGE: Adding TARGETDIR property. Its value is ‘C:’.

Interessanterweise kann bei der AppSearch Aktion mit Verzeichnissen wie WindowsFolder und ProgramFilesFolder gearbeitet werden obwohl diese vor der CostFinalize Aktion ausgeführt wird. Dementsprechend gibt es Verzeichnisse die schon vor der CostFinalize Aktion verwendet werden können.

Bei der Analyse einer Log-Datei wird ersichtlich, das vor der INSTALL Session, also noch bevor überhaupt eine Aktion ausgeübt werden kann, alle SpecialFolders (Magic Folders) aufgelöst werden und danach sofort zur Verfügung stehen.

Mit dem APICall SHGetFolderPath werden SpecialFolders aufgelöst.
MSI (s) (F8:E8): SHELL32::SHGetFolderPath returned: C:Documents and SettingsAdministratorApplication Data

Bei der Analyse der Log-Datei, sieht man jedoch den WindowsFolder, SystemFolder und den ProgramFilesFolder nicht aufgelistet. Diese Verzeichnisse stehen wie die restlichen SpecialFolders bei Beginn der INSTALL Session zur Verfügung.

Somit lässt sich aussagen, das SpecialFolders von Beginn der Installation verwendet werden können und Verzeichnisse, welche die Installation selber erstellt, nach der CostFinalize Aktion.

Mit dieser Erkenntnis können viele Custom Actions, welche mit SpecialFolders arbeiten, schon vor der CostFinalize Aktion ausgeführt werden.

Eine INI Datei nicht reparieren

In dem heutigen Post geht es in der Windows Installer Technologie um die Situation, dass eine INI Datei während einer Reparatur nicht aktuallisiert werden soll.

Das Standard-Verhalten bei einer Reparatur ist wiefolgt: Der Inhalt einer INI-Datei wird mit den Werten aus der INIFile Tabelle verglichen und bei einer Differenz mit den ursprünglichen Werten überschrieben.
Sollte ein Endbenutzer Änderungen an einer INI-Datei vorgenommen haben, so gehen diese bei einer Reparatur des Produktes verloren.

Gemäss der Windows Installer SDK kann über die Aktions-Spalte mit dem Wert 1 festgelegt werden, dass ein Eintrag nur überschrieben wird, falls dieser nicht vorhanden sein sollte. In vielen Fällen wird die Änderung der Aktion die Situation entschärfen, da die Vorgabe auch bei einer Reparatur angewendet wird.

IniFileTable
Mit der Action-Spalte lassen sich zusätzliche Modifikations-Optionen für INI-Dateien einstellen

Betrachtet man die Situation genauer, so kann es sein, dass ein Endanwender Werte aus der INI-Datei löscht. Diese werden bei einer Reparatur wieder hergestellt und verwirft damit die Konfiguration des Endanwenders. Es gibt keine Modifikations-Option die diese Situation berücksichtigt. Eine Möglichkeit bietet die Verwendung einer Kondition in der InstallExecuteSequence Tablle bei der WriteIniValues Aktion. Die WriteIniValues Aktion schreibt die Werte einer INI-Datei anhand der Instruktionen der INIFile Tabelle. Mit der Kondition NOT REINSTALL kann die Aktion bei einer Reparatur ausgelassen werden. Damit geht die Reparaturfunktion aller INI-Dateien verloren, was an dieser Stelle zu erwähnen ist.

INIFile
Bei der Reparatur kann die Modifikation von INI-Dateien ausgeschaltet werden

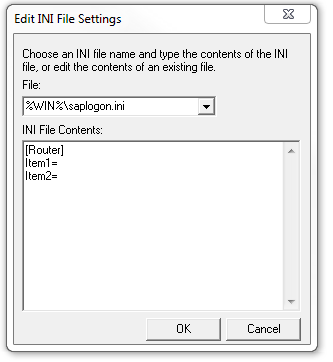
Sollten die beschriebenen Möglichkeiten keine Alternative zur Situation sein, so stehen weitere Möglichkeiten über Benutzerdefinierte Aktionen (Custom Actions) zur Verfügung. Eine einfache Möglichkeit ohne viel Aufwand mit Scripting-Sprachen zu verbringen bietet der Wise Script Editor. Mit der Funktion Editet INI File kann eine INI-Datei erstellt werden. Die Custom Action ist mit der Kondition NOT Installed  zu versehen, dann wird die Datei nur erstellt jedoch nicht geändert bei einer Reparatur.

Edit
Mit dem WiseScript Editor lassen sich einfach INI-Dateien erstellen.

MSI Patch – Feature Level 0 Effekt

Die Anzahl von Programmupdates, die auf Microsoft Windows Installer Patch-Dateien (.MSP) aufbauen, nehmen kontinuierlich zu. Dabei können Patch-Dateien auf unterschiedliche Wege ein Produkt aktualisieren.

Die folgenden Details zu einer Administrativen-Installation (Netzwerk-Installation) sind ein Bestandteil aus unserer Windows Installer Schulung ‘Schwarzgurtpaketierung’, die wir ab nächstem Jahr in unser Kursprogram aufgenommen und kürzlich als Power-Workshop im grösseren Kundenumfeld präsentiert haben.

Eine Möglichkeit der Patch-Integration ist eine Admin-Installation durchzuführen und diese mit einer Patch-Datei zu aktualisieren. Die aktualisierte Windows Installer Installation kann sowohl auf neuen Rechnern installiert werden, sowie bestehende Installationen über einen Reparatur-Zyklus auf den neuen Stand bringen.

In den meisten Fällen muss von der Original-Installation eine Admin-Installation durchgeführt werden (msiexec.exe -a datei.msi). Obwohl dies eine ‘High-Level’ Aktion ist, also eine grundlegende Windows Installer Funktion, ist dies keine Garantie dafür, dass der Software-Hersteller diese vollumfänglich unterstützt.

Ein Seiteneffekt kann die Feature Level 0 Problematik sein. Diese führt dazu, dass nicht alle Dateien extrahiert werden, da die Condition Tabelle bei einer Admin-Installation nicht abgearbeitet werden.
Es ist also vor einer Admin-Installation darauf zu achten, ob in der Feature-Tabelle ein Feature mit dem Level 0 existiert. Sollte dieses Feature-Level während einer normalen Installation geändert werden, so ist vor der Admin-Installation der Wert des Features zu erhöhen und nach der Admin-Installation wieder zurück zu stellen. Danach kann die Patch-Datei integriert werden.

condition
Mit Hilfe der Condition Tabelle kann ein Software-Hersteller während der Installation ein Feature-Level anhand von Konditionen verändern. Dies geschieht jedoch nicht während einer Admin-Installation, was zu Dateiverlusten führen kann.

Weitere Informationen zu unseren Wise Kursen sind auf unserer Schulungsseite zu finden http://www.ontrex.ch.